The number one reason the Richmond water heater pilot light won’t stay lit is an issue with the thermocouple. It can be dirty, bent, or damaged. You can solve this problem by cleaning it, adjusting its position, or replacing it.
However, it’s not the only potential reason behind this issue. A faulty valve control body and a damaged thermal release device are also common. Besides, a dirty pilot tube, lack of oxygen, flex tube issues, and a faulty flammable vapor sensor can also cause this issue.
Keep reading this guide to know all about these issues in detail and find out how you can address them. We’ll also discuss how to start the pilot light correctly in this guide. Let’s dive in!
Table of Contents
- Richmond Water Heater Pilot Light Won’t Stay Lit [7 Easy Fixes]
- 1. Thermocouple Issues
- How To Replace Richmond Water Heater Thermocouple
- 2. Faulty Valve Control Body
- 3. Broken Thermal Release Device
- 4. Dirty Pilot Tube
- 5. Lack Of Oxygen
- 6. Flex Tube Issues
- 7. Faulty Flammable Vapor Sensor
- How To Light Pilot On Richmond Water Heater Correctly
- FAQs:
- How does a thermocouple work?
- How to know if you have low gas pressure in your house?
- Does the flammable vapor sensor get dirty?
- What temperature will cause scalding when using Richmond heaters?
- Conclusion
Richmond Water Heater Pilot Light Won’t Stay Lit [7 Easy Fixes]
We’ll discuss the main reasons the Richmond water heater pilot light won’t light or stay lit in this section.
Note: Read our guide on how to fix Honeywell water heater troubleshooting.
1. Thermocouple Issues
Issues with the thermocouple are the most common reason the Richmond water heater won’t stay lit. It’s a safety device that checks whether the pilot light is working properly and prevents any gas leaks.
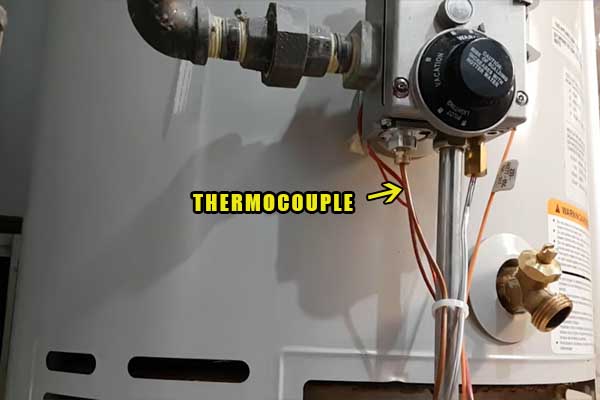
The easiest way to diagnose a Richmond water heater thermocouple is to test its voltage with a multimeter. You’ll have to remove one end of it from the gas control valve to inspect it. Use an adjustable wrench to do it.
Next, get a multimeter, switch it to volts, and set the range to millivolts. Clip the red or the positive lead of the multimeter to the copper part of the thermocouple.
The black or negative lead of the thermocouple will connect to the top of the silver knob. Look at this picture to have a clear idea of how to set it up:
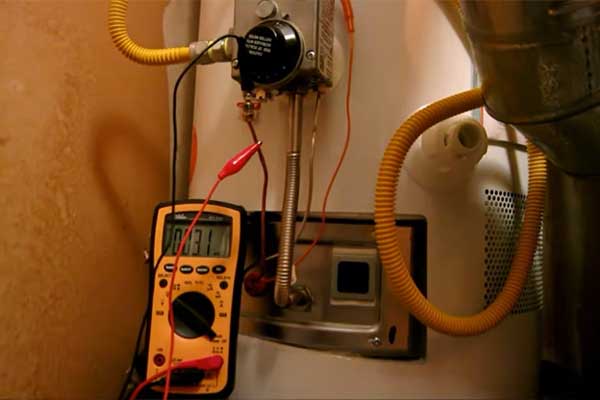
Then, turn the knob to the pilot and start pushing it down. As per instructions, you’re supposed to hold and press down the pilot for at least a minute. The thermocouple will start getting heated and increase the electricity it generates when working properly.
The reading on the multimeter should get to at least 20 millivolts. If that doesn’t happen and you get a significantly lower reading than that, it means that there is an issue with the thermocouple.
If you don’t have a multimeter, there’s another way you can diagnose a thermocouple. Attach a paper clip and use jumper wires on the thermocouple. If the pilot light stays on after that, the thermocouple is most likely at fault.
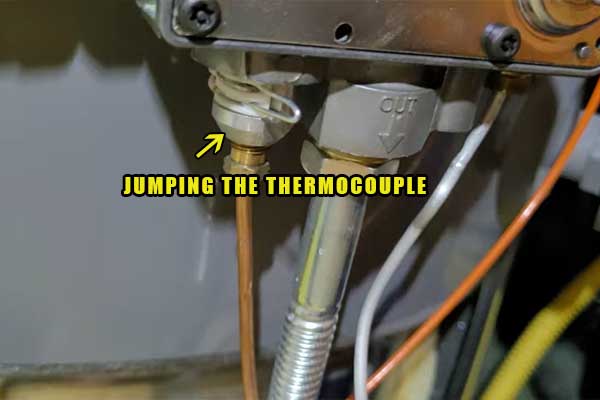
Only use this method to diagnose the thermocouple. Don’t see it as a way of bypassing the thermocouple. It’s a safety mechanism designed to protect against gas leaks. If you bypass it, it can lead to a major accident in the future.
The most common issues with the thermocouple are being bent, dirty, or damaged. Let’s explore each of them.
i). Bent Thermocouple
If your new Richmond water heater pilot light won’t stay lit, there’s a high likelihood that the thermocouple moved during shipping. Because of that, it won’t be able to detect the flame from the pilot light and shut it off. It can also get bent if something drops on it.
Even if it moves by a quarter of an inch, it won’t work properly. You’ll only know if it’s bent after you pull out the entire burner assembly and visually inspect it. We’ll tell you what to do about it in the section where we discuss replacing the thermocouple.
ii). Dirty Thermocouple
Like all other water heater components, the thermocouple can get dirty. After every couple of years of use, it’s normal for it to get dirty from the debris in the heater. When that happens, it won’t be able to sense the heat from the pilot.
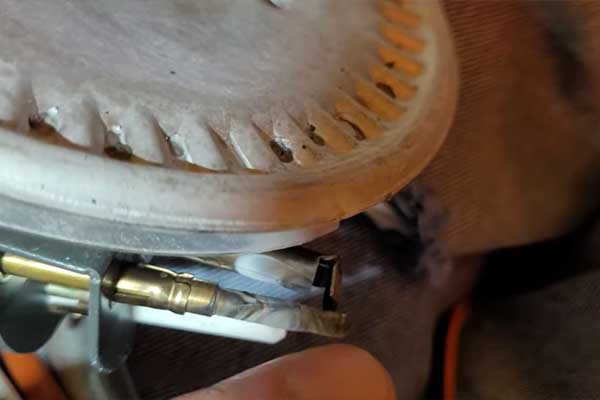
It reads the pilot light as being turned off and doesn’t generate the electricity it’s supposed to when it has accumulated dust. That keeps the pilot from staying lit and prevents the heater from igniting.
iii). Damaged Thermocouple
Under normal operation, the thermocouple generates a little bit of electricity when it senses the pilot light is on. This amount of electricity is enough to keep the gas valve open. When the pilot light is off, it stops producing this electricity and shuts off the gas supply to prevent any leaks.
But with time, thermocouples can go bad and fail to sense the pilot light. It’ll no longer generate the electricity needed to keep the gas supply to the main burner on. When that happens, you won’t be able to light the heater.
Solution:
Depending on the problem, the solution will vary. If the thermocouple is dirty, you can clean it with sandpaper. Clean it to solve this issue. Secondly, you’ll have to readjust the thermocouple if it has bent out of shape.
Finally, your only option when dealing with a damaged thermocouple is to replace it. No matter which is the solution based on your problem, you’ll have to pull out the burner assembly and look at the thermocouple.
Only then, you can decide what to do. It’s easy to replace the thermocouple on your own even if you have little experience working with such parts.
How To Replace Richmond Water Heater Thermocouple
Follow these steps below to replace the thermocouple by yourself :
Step 01: Remove Connections From The Gas Control Valve
- Shut off the main gas supply before doing anything else to ensure your own safety.
- Make sure the heater has had time to cool down before you start working on it.
- The thermocouple, pilot tube, and the gas supply to the main burner are all connected to the gas control valve. Remove them one by one.
Step 02: Pull Out The Burner Assembly
- Unscrew the four screws connected to the burner access door of the heater to separate it from the unit and pull it out.
- Pull out the burner assembly and inspect the thermocouple.
Step 03: Replace The Thermocouple
- If the thermocouple is bent, you’ll have to readjust its position and set it closer to the pilot. If it’s dirty, clean it with sandpaper or a piece of cloth and remove the layer of dirt and grime.
- When dealing with a damaged thermocouple, you’ll have to replace it. Put it through the holes of the bottom cover and adjust it correctly so that it works well without any issues.
That’s how easy it is to replace the thermocouple in your heater. Make sure you get the right part for your device as there are many variants of them. The ideal thing you can do is to call your manufacturer and ask them to send you the right Richmond water heater thermocouple replacement part for your model.
Here’s a quick summary of what to do when you have a bad thermocouple:
- Bent thermocouple: Make it curved again so that it’s close to the pilot.
- Dirty thermocouple: Clean it with sandpaper or a scotch Brite pad.
- Damaged thermocouple: Replace it with a new one.
2. Faulty Valve Control Body
If your Richmond water heater pilot won’t light despite having a good thermocouple, the next thing to look into is the main gas control valve. It’s an essential component of the heater.
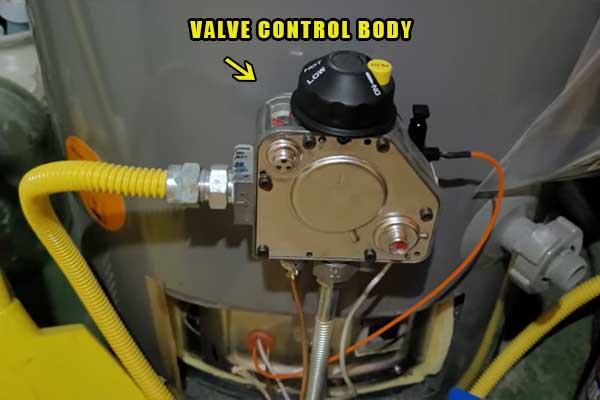
The pilot tube, gas supply to the main burner, and thermocouple are all connected to it. It regulates the gas pressure as well as the water pressure of your heater.
You can also control the pilot light and the other things in your heater from this valve assembly. It starts the pilot when you press the knob, and opens the gas supply to the main burner when the thermocouple signals to it that the pilot light is on.
Unfortunately, they can fail from time to time and it’s a common issue in Richmond water heaters. Especially, if you’ve been using your unit for a long period by now. When it fails, it won’t supply the required gas, and your Richmond gas hot water heater pilot light won’t stay lit.
Solution:
If the control valve goes bad, you’ll have to replace it. The first thing you’ll have to do before doing that is to drain your tank. When draining the tank, make sure nobody is around that area.
A person can be easily scalded if the hot water touches them. Once the draining is completed, you’re ready to remove the old control valve and install the new one. If you’re covered under warranty, Richmond will send you a new gas control body and you can install it on your own.
3. Broken Thermal Release Device
The TRD or thermal release device is an important component of your heater that ensures proper airflow in it. It’s located at the bottom and you’ll see it clearly after removing the burner assembly. It’s also called FVIR or Flammable Vapor Ignition Resistant device.
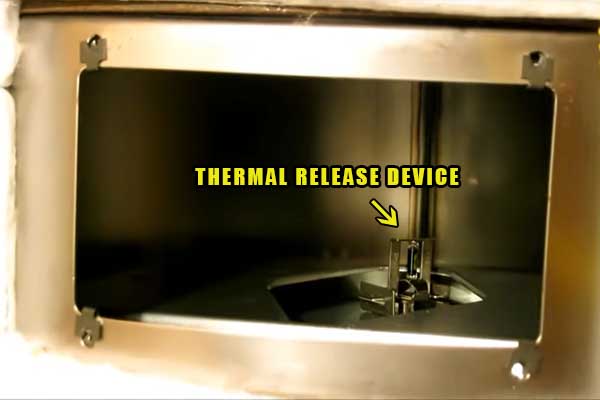
A potential reason why your Richmond hot water heater pilot light won’t stay lit is a broken thermal release device. As you know how to take the burner assembly out, you can easily inspect it.
There’s a glass bulb in the thermal release device. That glass gets broken when the temperature inside the combustion chamber gets too hot and the vents will get closed. All these things will keep oxygen from entering the combustion chamber and that’s why the pilot light in your heater won’t stay lit.
Solution:
You’ll have to replace it if it’s broken. You can get a kit called the combustion shut off device to do a proper replacement job. By now, the burner assembly should be already been removed since you inspected it.
Next, remove the old TRD and install the new one in its place. With the combustion kit, you’ll also get a gasket. It’s a good idea to replace it as well. Remove the old one from the back of the burner cover and put the new one in.
Replace the speed clips as well. Make sure that the new gasket doesn’t trap any insulation. Put everything back together and try to relight the pilot again. If it works, you’ve solved the problem. Otherwise, you’ll have to keep on diagnosing.
4. Dirty Pilot Tube
The pilot light needs sufficient gas for combustion. This gas is supplied through the pilot tube from the valve control time. Unfortunately, the pilot tube can get clogged with time.
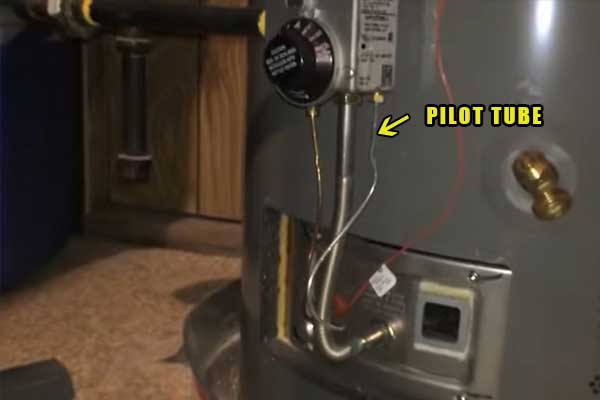
When that happens, the obstruction in the pilot tube will reduce or stop the supply of gas to the pilot light. In that case, the chances of the pilot being lit are slim. Even if it lights up, it won’t stay lit for long due to poor gas supply.
Solution:
Luckily, the pilot light being dirty isn’t something to be too concerned about. A thorough cleaning job will solve this issue. Disconnect it from the valve control body and stick a needle to clean the tube.
It’s important to be patient here as some pilot tubes can get extremely dirty. You may need to do it multiple times to end up with a clean pilot tube. Once you’re done, put it back. The flame should be blue and steady if you did a good job when cleaning the pilot tube.
5. Lack Of Oxygen
Besides the supply of gas, the pilot also needs oxygen in the air to burn and stay lit. If there’s not enough combustible air in the environment, the pilot light on water heater won’t stay lit.
A common culprit behind not having enough oxygen is a broken TRD device. But you’ve already inspected and replaced it. Another common cause of it is when the heater itself is dirty.
The area surrounding the pilot light needs to be clean and free of any clutter or debris to ensure proper airflow. If there’s a build-up of excessive dirt and grime in there, it can interrupt the flow of air and keep the pilot from staying lit.
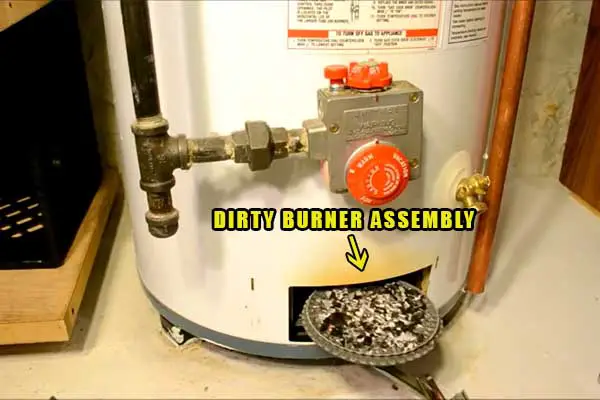
Remove the burner assembly and check if it’s dirty. If the air intake screen of the heater is blocked, air won’t be able to pass through it and that’ll keep the pilot light from coming on.
Solution:
If you want to get rid of this problem, you’ll have to do a thorough cleaning of your heater. Start by cleaning the burner assembly and remove the dirt from the pilot light, thermocouple, and burner.
Clean the gas lines as well if they are dirty. To unclog the air intake screen, you can blow the dirt from it with a shop vac. You can use a bristle brush and clean the bottom of the water heater including the combustion chamber.
Doing these things should be enough to make the pilot stay lit if the lack of oxygen was causing the issue. Do this maintenance of your heater from time to time to prevent these issues from occurring in the first place.
6. Flex Tube Issues
The pilot light and burner assembly both get gas from the valve control body. And the valve control body gets this supply of gas via the flex tube. If there’s anything wrong with the flex tube, the gas supply will be interrupted. It can lead to several issues like the pilot not being lit.
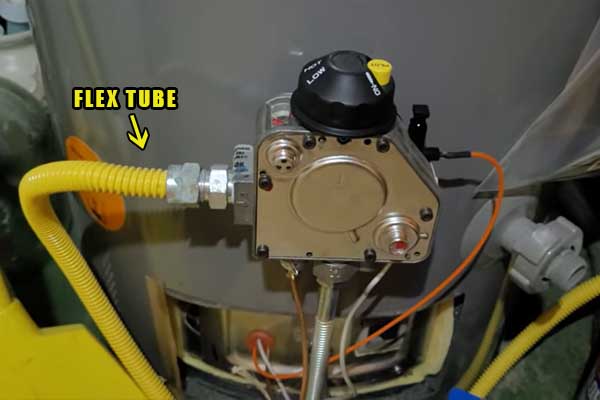
It’s not common for the flex tube to have issues. So, make sure you did a thorough job checking the thermocouple and TRD before moving on to it. When something goes wrong with the flex tube, the normal issue is that it’ll get kinked. Inspect it visually to see if that’s the case.
Solution:
If there are kinks in the flex tube, the job is simple. All you have to do is straighten them out and that should solve the issue. If your pilot light still has issues, check for gas leaks. In that case, you may have to replace the flex tube altogether so that the pilot light stays lit.
7. Faulty Flammable Vapor Sensor
The flammable vapor sensor is also a safety device installed in the heater that detects gasoline or other flammable materials around it. It shouts off the heater when it senses that. The pilot light won’t be lit in this instance.
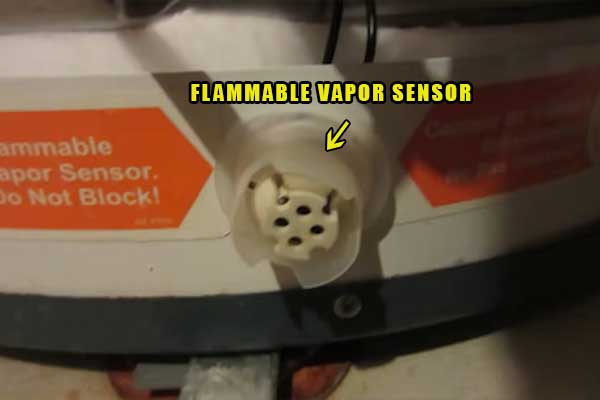
The most common error codes that indicate issues with the vapor sensor are a Seven flash with a three-second pause and an Eight-One Flash with a three-second pause.
Solution:
First things first, make sure that there are no flammable materials in the environment. Once you do that, you can replace the vapor sensor with a new one. The FV sensor wiring can also go bad from time to time. Replace it as well if that’s the case.
How To Light Pilot On Richmond Water Heater Correctly
If you’re still wondering why the pilot light won’t stay lit when I release the knob, you may be doing something wrong when lighting the heater. Follow the instructions in your owner’s manual to light the pilot in your Richmond water heater correctly.
The heater has a piezoelectric spark ignition system with a standing pilot light. Always use the knob to turn on the pilot light. Never try to light in manually by hand or using a long match stick.
As a precaution, it’s a good idea to smell for a gas leak before you try to light the pilot. If you smell any gas around the heater, don’t light anything. Leave your house and call the gas supplier to have it fixed.
If there’s no smell of gas, you can proceed to light the pilot. Always use your hand to turn the knob that lights the pilot. Never use any tools for it. With that said, follow these steps to light the pilot:
- Move the dial to the “Off” position to get rid of any unwanted gas residue in the burner chamber. Leave it like that for a few minutes.
- Turn the knob to the “Pilot” position and hold it down for a minute. While holding it down, press the igniter button a few times to light the flame.
- The gas control knob should pop up when you release it. See the flame through the window and check if the flame is lit.
- Once the pilot is lit, turn the knob to the “On” position and set the thermostat dial to your desired temperature.
FAQs:
How does a thermocouple work?
The thermocouple sends an electrical signal to open the gas valve when it senses that the pilot light is on. When it’s off, it notices the drop in temperature and signals to close to the gas supply.
How to know if you have low gas pressure in your house?
There’s a device called a manometer that’s used to check the gas pressure. You can check it on your own if you have this device. Otherwise, you can call the local gas provider in your area and have it inspected.
Does the flammable vapor sensor get dirty?
You’re not supposed to clean the vapor sensor. Make sure that it’s free from any obstruction or insulation. Do not submerge it under water or try to clean it. When it goes bad, your only option is to replace it.
What temperature will cause scalding when using Richmond heaters?
Both the temperature and the time exposed to that temperature have an impact on scalding. It’ll take 5 minutes to produce a serious burn at 120 °F But it’ll only take a second to do the same at 155 °F.
Conclusion
Now you know the main reasons why the Richmond water heater pilot light won’t stay lit despite your efforts. Remember that the thermocouple will be the issue in most cases.
But if that’s not it, follow this guide and inspect all the other potential reasons behind it. Let us know what turned out to be causing the problem in your case. Comment below if you have any questions about Richmond heaters.
You can also read our guide on why Rheem water heater failed ignition lockout and how to fix it.
