If your Dyna-Glo heater lights for a few seconds and then dies when you release the control, you’re most likely dealing with a weak or failed flame sensor or thermocouple.

In this guide, I’ll show you exactly how to replace a Dyna-Glo thermocouple. We’ll also cover the essentials first. You’ll learn how it works, how to confirm it’s the culprit, what tools and parts you actually need, and how to avoid repeat failures. Without further ado, let’s dive in!
How To Replace A Dyna-Glo Thermocouple [Complete Guide]
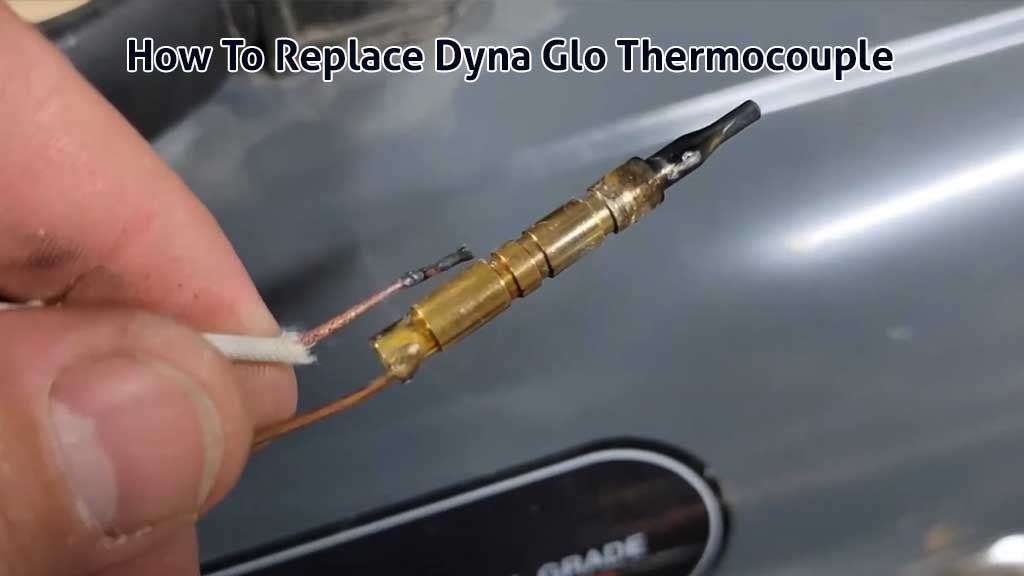
A thermocouple is a small metal probe that sits in the pilot flame. When the tip heats up, it creates a tiny DC voltage—just a few millivolts. That voltage keeps the safety magnet in your gas valve energized, which allows gas to keep flowing.
If the flame goes out or the sensor can’t “feel” the heat, the signal drops. The magnet releases, and the valve shuts off fuel right away. That’s why a bad or misaligned Dyna-Glo thermocouple causes those classic shutdown symptoms.
When people ask where to find it, I tell them to look for the Dyna-Glo thermocouple location. Just follow the thin copper wire from the pilot flame back to the gas valve. And if you see posts about a “Dyna Glo thermocouple bypass,” skip them. Bypassing safety devices is dangerous and defeats the system that prevents gas leaks.
Common failure causes include soot on the tip, corrosion, loose valve connections, poor alignment, or simple wear and tear. A healthy thermocouple should read around 25–35 mV when heated.
Things To Check Before Replacing A Dyna-Glo Thermocouple
Before you order anything, run a few quick checks. Many “bad thermocouple” problems get solved right here.
1. Confirm Gas Supply & Regulator Behavior
Open propane valves slowly so you don’t trigger the excess-flow device. If you just changed cylinders, purge air with a couple of careful lighting attempts, as the manual says.
Check the hose for kinks, and make sure the regulator isn’t frozen in cold weather. If you’re not sure about the lighting process, keep the manual handy.
It’ll remind you how to light a Dyna-Glo heater properly before blaming the sensor.
2. Look At The Pilot Flame
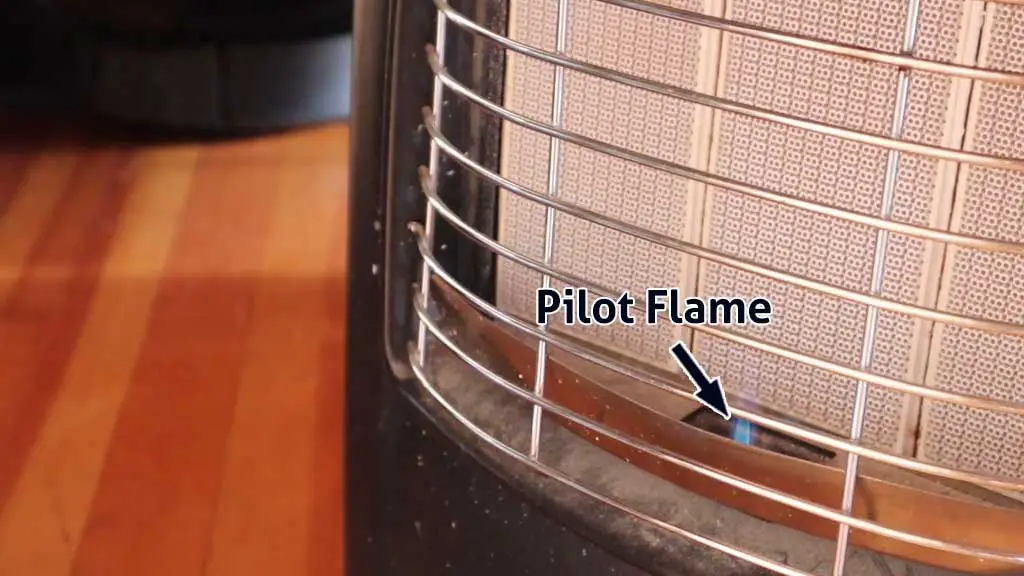
Relight the pilot following your model’s instructions and watch the flame shape. It should be steady and blue, wrapping cleanly around the thermocouple tip.
A weak, yellow, or noisy flame usually means the orifice is dirty. Let it cool, then blow compressed air around the pilot to remove lint or dust. Never poke a needle into the orifice, as it can damage it. These same checks apply to a patio heater thermocouple replacement as well.
3. Reposition The Sensor
If the tip isn’t sitting directly in the pilot flame, adjust the bracket until it does. Even a few millimeters off can cause the heater to shut down. This small tweak prevents many unnecessary replacements of the Dyna-Glo thermocouple.
4. Clean The Tip
Turn the gas off, let the unit cool, and gently buff the tip with fine Scotch-Brite or another soft abrasive. You’re cleaning, not sanding it down. Relight afterward and test.
5. Reseat The Valve Connection
Loosen the small thermocouple nut at the gas valve, then retighten it snug—finger-tight plus a small wrench turn. Don’t overtighten; it can crush the soft seat and weaken the signal.
If you have a multimeter, do an optional check. Heat the tip with the pilot and measure the output in DC millivolts. A healthy reading is around 25–35 mV. If it stays low despite a strong blue flame, it’s time for a replacement.
Tools, Safety, and Workspace Setup Before Replacing The Thermocouple
Keep these things in mind before you start the thermocouple replacement process:
Tools You’ll Actually Use
You don’t need a full workshop for this job. Grab an adjustable wrench or a set of open-end wrenches. Keep Phillips and flat screwdrivers for access panels or brackets. Use needle-nose pliers for clips and a flashlight for visibility.
You’ll also need soapy water for leak checks and fine Scotch-Brite or a very fine abrasive pad for cleaning the thermocouple tip. A multimeter is optional but helpful. If you’re missing hardware like brackets, screws, or clips, order them as Dyna-Glo replacement parts so everything fits correctly.
Safety Checks
Turn the gas off at the cylinder or shutoff valve. Unplug any corded fan or ignition system. Let the heater cool completely before you touch it. Work in a well-ventilated area with no open flames or sparks nearby.
After reassembly, always do a leak test. Spray soapy water on every joint you touched—never use a lighter. Take clear photos of wire routing and bracket positions before removing anything.
These basics come straight from real service manuals and Dyna Glo guides. They’re not suggestions—they’re required.
Picking the Right Replacement (OEM vs Universal)
You’ve got two clean paths to a correct part:
Option A: OEM/Model-Specific
Start by checking your exact model number. You’ll find it on the rating label or in your manual. Once you have it, order the thermocouple assembly listed for that model.
For example, Dyna Glo’s documentation shows that most forced-air “Delux” or construction LP heaters use Thermocouple 2304885 (1130/1474-425L). The radiant or natural gas models, like RA100NGDGD or RA250NGDGD, list Thermocouple 2201591 instead.
If you’re working on a propane unit and searching for how to replace a thermocouple on a Dyna-Glo propane heater, the OEM route is the safest bet. It removes the guesswork with part length, clips, and valve thread. You can also search Dyna-Glo propane heater parts by model if your manual is missing.
Option B: Universal Thermocouple
If OEM parts aren’t available, you can use a universal millivolt thermocouple. It works for most standing-pilot Dyna Glo heaters as long as the length and connection match.
The standard valve thread is 11/32-32 male. Common lengths include 18″, 24″, 30″, 36″, and sometimes 48″. Look for kits that include adapter fittings and mounting clips so the tip sits correctly in the pilot flame.
This approach also applies when choosing a thermocouple for Dyna Glo gas heater models that don’t have a parts list. Honeywell’s Q390 line is the classic reference—it lists thread and length options that fit most setups.
Quick length tip: Measure your old one (tip to connector) before removal, or cross-check by model in the Dyna Glo manual/parts list.
How To Replace A Dyna Glo Thermocouple. Step-by-Step Guide
Alright, enough talk. Now, let’s get to the main point. Follow these steps patiently. You don’t need brute force—just care and proper sequence. Make sure you’re patient and you understand each step before doing it:
Step 1 – Shut Down, Open, And Remove The Old Thermocouple
Start by turning everything off. Close the gas valve—propane turns clockwise, and for natural gas, move the lever perpendicular to the pipe to shut it off. Unplug the unit if it has a fan or ignition system, and let the heater cool completely.
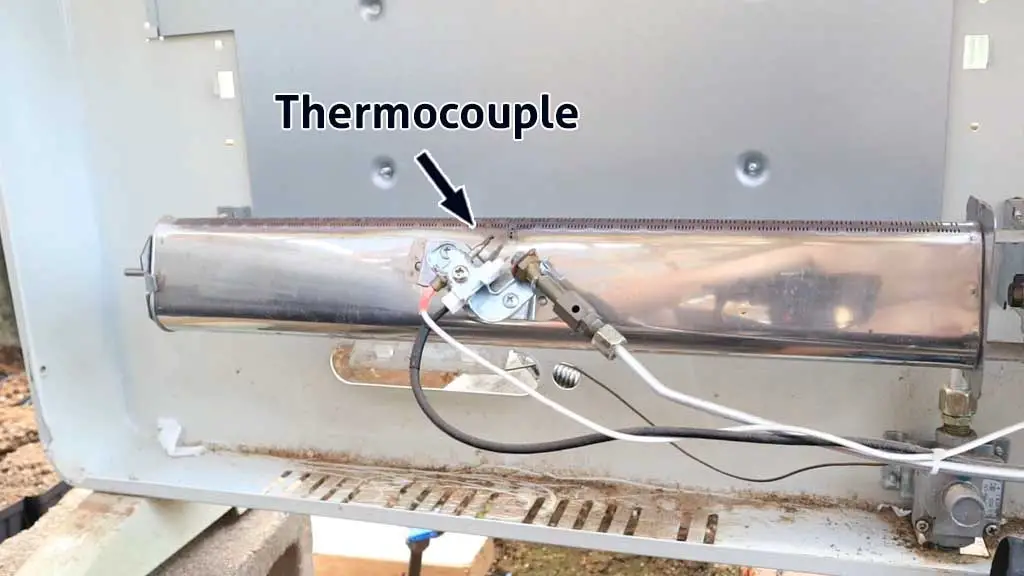
Next, remove the access panel to reach the pilot assembly. The thermocouple is the thin copper line running from the pilot area to the gas valve. Take a photo of how it’s routed and positioned before you loosen anything. This same step applies to nearly any Dyna-Glo heater with a standing pilot.
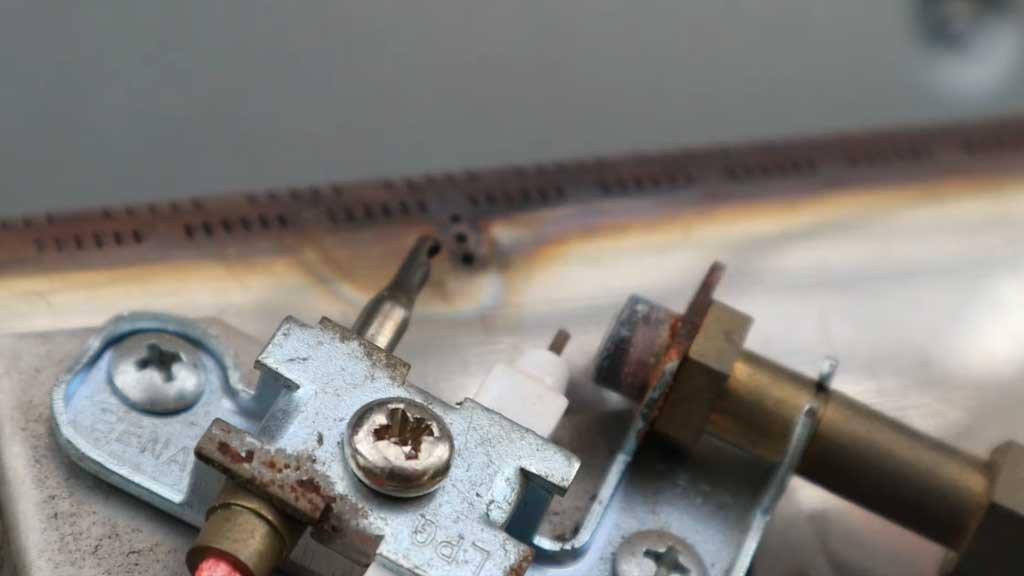
At the gas valve, gently loosen the small compression nut counterclockwise and pull the lead free. Don’t over-tighten or over-loosen, as it’s a soft seat.
Then, move up to the pilot area and release the clip, bracket, or screw holding the thermocouple. Slide the tip out carefully, avoiding any pressure that might bend the pilot parts.
Step 2 – Install And Route The New Sensor Correctly
Now, install the new thermocouple. Position the tip so it sits directly in the pilot flame’s blue envelope. That steady flame should bathe the tip completely—this is how it senses heat properly. Route the new lead the same way the old one ran, keeping it away from sharp edges or hot metal. Avoid tight bends.
At the gas valve end, thread the connector by hand first to prevent cross-threading. Once it’s seated correctly, snug it with a wrench—finger-tight plus a small additional turn is enough. Don’t “gorilla-tighten” it.
Step 3 – Reassemble, Test for Leaks, and Relight
Reinstall the access panels and make sure everything’s secure. Open the gas supply slowly, then spray soapy water on every connection you touched. If you see bubbles, that’s a leak. Shut the gas off, tighten the fitting, and test again until there are no bubbles. Never use a lighter for leak testing.
When everything is sealed, follow your model’s lighting sequence to relight the pilot. Hold the pilot button for the recommended time. It’s usually between 30 and 60 seconds, and then release it.
If the pilot stays lit, the repair worked. If the pilot doesn’t stay lit, double-check your manual’s lighting instructions or the section on how to replace a thermocouple on a Dyna Glo propane heater to confirm you followed the correct steps.
Things To Check After Replacing The Thermocouple
Once you’ve replaced the thermocouple, focus on three things.
- Pilot quality: The flame should be steady and blue, wrapping around the thermocouple tip without roaring or lifting off. A soft blue envelope is ideal.
- Hold behavior: After lighting the pilot and holding the control knob for the required time, release it. The pilot should stay lit without hesitation.
- Main burner: When you switch it on, the burner should ignite with a stable, mostly blue flame.
If the pilot looks too sharp or makes a roaring sound, resist the urge to turn it up. An overly hot flame can damage the tip and shorten its lifespan. Keep doing leak tests on every joint you worked on, even if things seem fine.
These same post-repair checks apply whether you used OEM or universal Dyna-Glo replacement parts.
Troubleshooting: If It Still Drops Out
If the pilot still won’t hold after a correct installation, walk through these points in order.
Flame alignment: Make sure the tip sits directly in the flame, not beside it. Micro-adjust the mounting bracket until the flame fully covers the sensor.
Weak or yellow pilot: Blow compressed air around the pilot orifice to remove debris, but don’t poke the jet. If the flame stays weak, check your fuel supply or regulator for issues.
Loose or dirty valve seat: Reseat and tighten the thermocouple nut carefully. Over-tightening can crush the soft seat and weaken the signal.
Low supply pressure or regulator icing: A nearly empty propane tank, frozen regulator, kinked hose, or tripped excess-flow device can all mimic a bad thermocouple. Open propane valves slowly and check the condition of the hose and regulator.
Valve magnet failure: Rare, but possible. If you have a strong blue flame directly on the thermocouple tip and good millivolt output, yet the pilot still drops out, the gas valve’s internal magnet may be failing. Replace the valve—don’t attempt to repair it.
Other safeties: Some models include tip-over switches, high-limit cutouts, or ODS (oxygen-depletion) pilots. A failed switch or loose connector can mimic a bad thermocouple. Check all connectors and replace safety switches using the exact part number. A Dyna Glo propane heater parts diagram helps speed this up and avoid mix-ups.
Maintenance Tips To Prevent Dyna Glo Thermocouple Failures
Follow these pro tips to make sure that you won’t have to replace the thermocouple again anytime soon:
- Clean the pilot assembly at least once a season—or more often if you use the heater in a dusty area. Blow out dust and lint with compressed air, and use a small brush to remove loose debris. Never poke a pin into the orifice; that can ruin it.
- If you see soot buildup on the thermocouple tip, polish it lightly. Focus only on the very end, and do it gently.
- Inspect fittings once or twice each season. Heat cycles can loosen them over time, so give them a snug turn if needed. Always leak-test afterward.
- Keep an eye on the flame color and shape. Both the pilot and main burners should burn steadily and blue. If you see yellow, flickering, or strange colors, it often means dust in the pilot or low gas pressure. Fixing it early prevents the thermocouple from running at the edge of failure.
- For off-season storage, shut off or disconnect the gas supply. Cover the top to keep out insects, spiders, and debris. Store the heater in a dry place. If your unit uses batteries for ignition, remove them to prevent corrosion. These same storage habits work well for other outdoor heaters, too, including those with patio heater thermocouple replacement parts.
Right Thermocouple Replacement Options For All Dyna Glo Models
Finding the right thermocouple for your heater can feel overwhelming at first. But you don’t need a massive parts catalog to buy the right thermocouple—just match it by model and part number.
1. Forced-Air “Delux” or Construction LP Heaters
Most worksite Dyna Glo units use thermocouple 2304885, also listed as 1130/1474-425L in parts tables. The exact length can vary by assembly, so double-check your manual’s parts list before ordering. If OEM parts aren’t available locally, choose a universal thermocouple clearly marked for Dyna-Glo compatibility.
2. Radiant or Blue-Flame (RA-Series, Wall or Cabinet Style)
Models like RA100NGDGD and RA250NGDGD typically use thermocouple 2201591, located in the ODS/pilot assembly area. Always confirm your specific sub-model in the parts list.
3. Universal Option When OEM Is Delayed
If you can’t get an OEM part quickly, the Honeywell/Resideo Q390 series is the most reliable universal option. It supports the standard 11/32-32 valve thread and comes in lengths from 18 to 48 inches.
Choose the shortest one that comfortably fits your original routing, and use the included brackets or adapters to seat the tip correctly in the pilot flame. It’s the best quick substitute while waiting for official Dyna-Glo replacement parts.
If your heater model isn’t listed here, simply use your model number with Dyna Glo’s manual or parts list. The thermocouple number will be shown in the parts section, so you can order with confidence and avoid mix-ups.
FAQs
How long do thermocouples last?
Usage and environment vary, but many homeowners replace them every 3–5 years in regular service. Soot, drafts, and vibration shorten life; clean pilots and steady flames extend it.
Can I “fix” a thermocouple by cleaning?
Cleaning helps if soot is the only issue. If the output is weak even with a perfect blue flame and clean connections, replacement is the reliable fix (they’re inexpensive and safety-critical).
Will a universal thermocouple definitely fit?
Universal kits usually do if you match the thread (11/32-32) and length, and you have the right clip/bracket. But when possible, OEM is a guaranteed fit with no improvising.
Why does my pilot flame keep going out on my Dyna-Glo heater?
It can happen due to dirt in the pilot, poor flame alignment, low gas pressure, or a worn thermocouple that no longer generates enough voltage.
Conclusion
You’ve now seen exactly how to replace a Dyna-Glo thermocouple, how to verify it’s the real issue, and how to keep the pilot and burner steady for the long run. The job is simple, cheap, and safe when you work methodically; you can’t mess it up.
Shut off the gas, place the tip squarely in a clean blue flame, snug the fittings, and always perform a leak test. Keep the pilot spotless and the area ventilated, and you’ll avoid repeat failures for seasons to come with any Dyna-Glo heater you maintain.
Also, you can check out this Dyna-Glo propane heater troubleshooting guide to fix any issues you face with your heater. Best of luck!