
Raypak high limit 1 fault and 2 fault indicates that the High limit has exceeded the 135F temperature. The HL switches will open due to the raising temperature inside the inlet/outlet header up to 135 – 140 F.
The root reasons behind the errors include low water flow through the heater, calcified heat exchanger, blockage in tubes, corroded Unitherm governor, and faulty internal bypass valve.
Sometimes, defective high-limit switches are the culprit that needs a quick replacement.
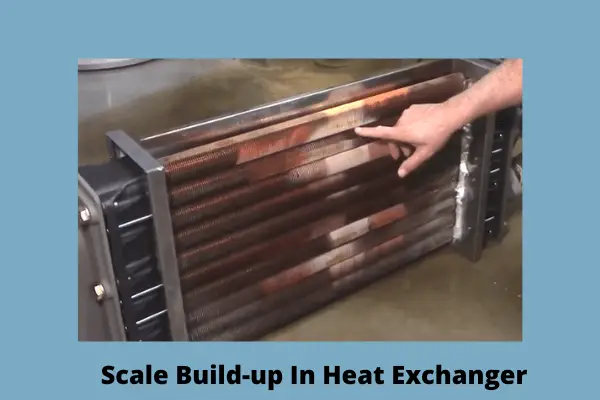
The heater overheats when the water temperature exceeds the tube bundle. Then the high limit will reset automatically when the unit gets cool and erase the errors. If not, you need to look for the scale build-up inside of the heater and need to clean it.
Read through the below effective guide to get complete details about the high-limit fault on the pool heater.
Table Of Contents
- When You Can See High Limit 1 Fault & 2 Fault
- Raypak High Limit 1 Fault And 2 Fault [5 Easy Solutions]
- 1. Calcification On The Heat Exchanger
- How To Clean Pool Heater Heat Exchanger
- 2. Low Water Flow
- 3. Corroded Unitherm Governor
- 4. Faulty Internal Bypass Assembly
- 5. Defective High Limit Sensor
- FAQs:
- Why does my Raypak pool heater keep shutting off?
- How long should a Raypak pool heater last?
- Why is my pool heater making banging noises?
- Wrapping Thoughts
When You Can See High Limit 1 Fault & 2 Fault
In the Raypak pool heater, there have two high-limit sensor switches. When the temperature exceeds more than 135 degrees Fahrenheit on HL1, this sensor opens and displays the fault1 error code.
For the same, the heater catches the HL2 fault code when the HL2 sensor opens because of excessive temperature. All the responsive factors and corresponding troubleshooting methods for these 2 codes are quite the same.
Raypak High Limit 1 Fault And 2 Fault [5 Easy Solutions]
Here we have included detailed causes and solutions to break down the high limit 1 and 2 fault error codes on your Raypak pool heater.
Note: You can also read how to fix the Raypak pool heater won’t ignite problem.
1. Calcification On The Heat Exchanger
If you are getting high-limit fault codes on your heater, the first suspect element is the heat exchanger. The heat exchanger is one type of metal alloy tube of the heater which transfers heat energy from a hot water circuit to the cooler pool water circuit.
It flows the heat from one fluid to another even without coming in direct contact with each other.
Anyway, there are several reasons for causing the heat exchanger failure. The first reason is prolonged exposure to high concentrations of free chlorine in pool water, which causes premature deterioration of this element.
A calcified heat exchanger leads to the water flow issue and fails to transfer the pool water efficiently, excessive heat will go to the flue, and trip the switch.
Shoot and scale build-up into the heat exchanger tube bundles are the most common reason for the pool heater’s high limit 2 faults.
How To Clean Pool Heater Heat Exchanger
Follow these steps for effective heat exchanger cleaning:
- To descale the scale build-up from the heat exchanger, you need to disconnect it from the heater.
- In order to do this, shut off the heater and water supply. Now, close the valves and then remove the relief valve.
- Remove the side access panel. Disconnect the rear top panel by removing the top jacket holding screws.
- Also, remove the screws mounting the rain shield and then disconnect it.
- After disconnecting the flue collector, remove the heater screws that secure the heat exchanger.
- Lift the heat exchanger straight up and move it to a clean surface.
- To clean the scale, apply a degreaser using a soft-tipped brush.
- After applying, wait for some time until the degreaser dissolves the shoot.
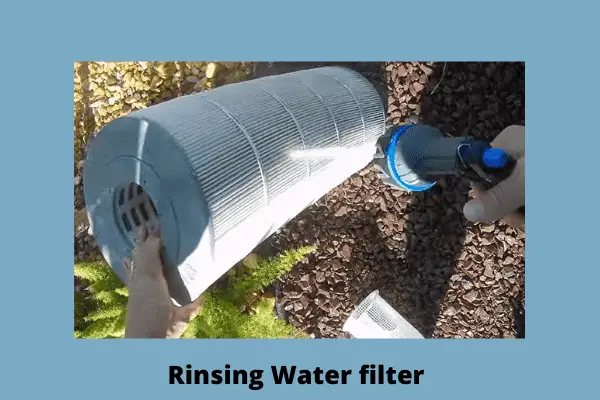
- Now, rinse the heat exchanger using the garden hose. Replace the heat exchanger if it is needed
- Don’t miss cleaning out the blocked tubes of the heater. Inspect and check each line’s tube for any type of physical damage or leakage.
- Reassemble the heater. The fault codes should be erased.
2. Low Water Flow
Insufficient water flows through the unit is another leading reason for the Raypak pool heater’s high limit 1/2 fault error. Here the water filters or pump’s line strainers might be blocked with debris, and that is restricting the water flow.
In some cases, the water flow restricts inside the inlet/outlet header. Another notable culprit is the pressure switch which ensures the water flows through the unit before it allows the heater to turn on.
Now, an incorrect voltage stops the normal function of this switch, and that causes low water flow. There has also water bypass valves right at the heater’s intake, which allows water to flow to the heat exchanger.
Incorrect installation of these valves, low water level, and faulty plumbing fitting lead to water flow restrictions. More to the point, the heater needs a 45 GPM minimum to operate safely. Follow the below instructions to fix the low water flow issue from the heater.
Solution:
Before starting the cleaning procedures, turn off the pump to stop the water flow. Then, you need to clean the water filter. For this, disconnect the filter from the cartridge counter. Rinse the filter using the water hose. Keep rinsing the filter until it gets cleaned.
Then, look through the pump’s strainer basket. Remove the strainer and unclog it from the stuck debris. Replace the defective strainer basket.
Then, verify that the pump basket and lid are in good working condition. Replace the defective plumbing fitting and the small pump as well if it is too small. Make sure the water level is adequate
After that, check for the voltage supply through the pressure sensor using a multimeter. Replace the defective pressure sensor if needed.
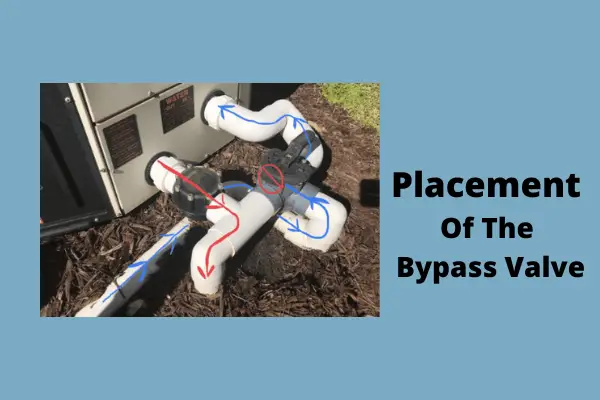
Ensure correct placement of the bypass valves as well.
3. Corroded Unitherm Governor
If the above two major can’t resolve the error, the third most suspecting factor is the thermal governor. This senses when the water in your heater is too hot.
Also, it changes the function as needed and protects some essential heater parts from damage.
Anyway, if the thermal governor is pitted, rusted, or corroded, it fails to regulate the water flow, and as a result, the water starts moving very slowly via the heater. This leads the heater to overheat and catch the HL errors.
This time, we will inspect and check out the thermal governor.
Solution:
First, shut off the water supply and close the valves. Shut off the relief pressure as well. Remove the retainer plug, which is located next to the outlet pipe connection on polymer header models.
De-solder the older unitherm governor from the retainer plug. Check out this equipment.
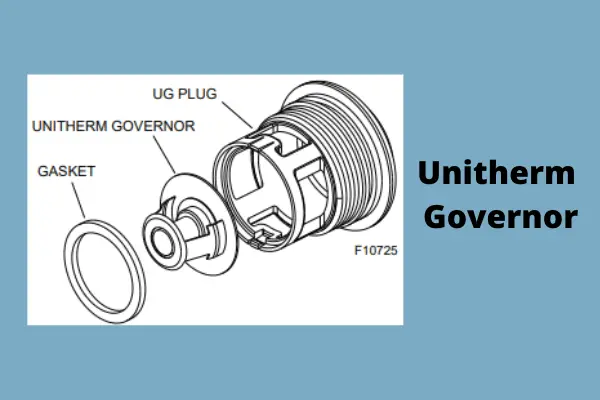
If it is corroded or rusted, then it is likely your issue. The corroded unitherm governor looks like the below and it needs replacement.
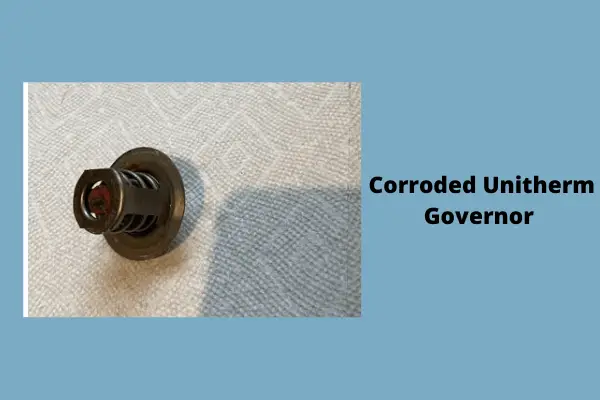
Replace the Unitherm Governor by reversing the above steps in sequence.
4. Faulty Internal Bypass Assembly
Along with the unitherm governor, there is a built-in automatic internal valve is assembled in the In/Out header.
After responding to the water regulating system by the UG, the internal bypass valve starts responding to the changes in water pressure in the piping system.
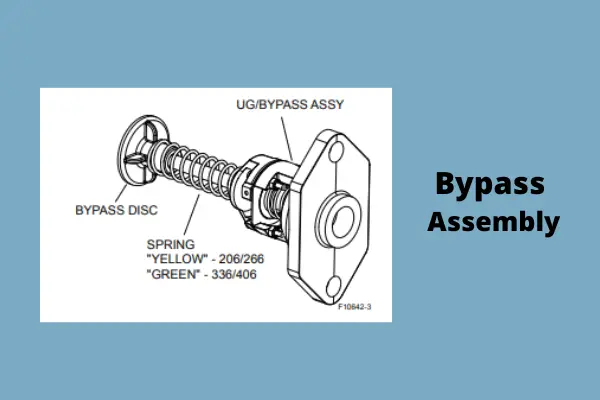
It ensures a balanced amount of water flow through the heater under various water pressures dictated by the conditions of the pump and filter.
Anyway, due to a bad internal bypass valve, it fails to continue the normal operation and causes the heater to overheat. That triggers the high-limit sensor fault code 1 and fault code 2.
Solution:
First, you have to locate the internal bypass valve. It is located on the header side where pipes go in. Unscrew the attached screws from the assembly and detach the older bypass valve. Check to see if it is corroded or rusted.
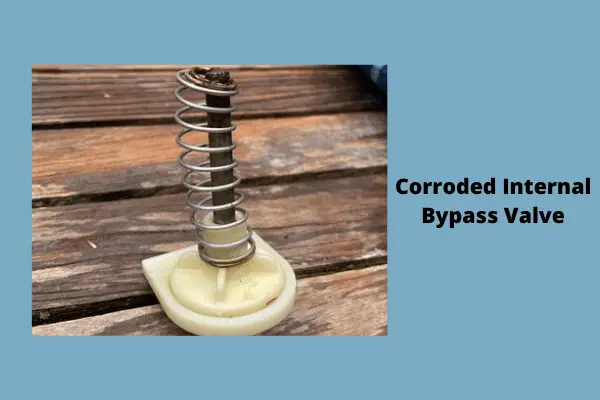
Replace the damaged internal bypass valve.
5. Defective High Limit Sensor
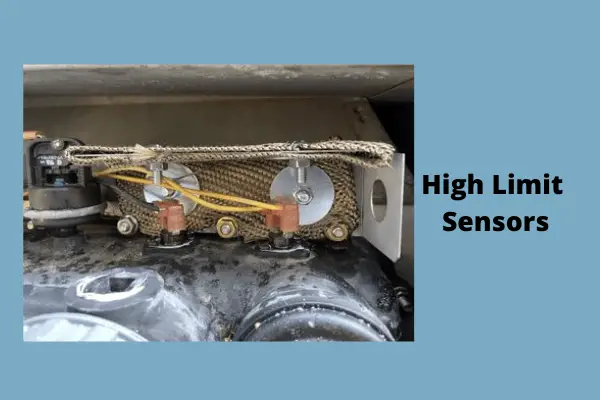
If all the above troubleshoots have not fixed the error codes, the defective high-limit sensor would be one of the leading reasons behind this. There has equipped two high limit sensors in the heater.
HL1 is a manual reset that is set to open at 160°F (71°C). Besides, HL2 is automatic that is set to open at 135°F (57°C). Both high-limit sensors are located in the inlet/outlet header of the heater. Here is the image of two HLS sensors with orange caps and two wires in each.
Anyway, there are several reasons for causing high-limit sensor failure in the heater. Sometimes, a bad or dirty connection at the switch causes it’s defective.
Also, damaged wiring from the switch back to the board and incorrect sensor positioning is also responsible. Otherwise, the complete HLS switches are defective and need replacement.
Solution:
Adding thermal paste to the sensors is an effective fix to this trouble. Experts also suggest adding high temp insulation to the factory metal heat shield if there are exhausting gas and heat trapped in that area.
You can measure the temperature by connecting a thermocouple at that high limit switch. By this, you will know either the water temp is high or the switch is getting hot from the surrounding area.
Or, you may measure the switch temperature by removing it and placing it in a pot of water on the stove.
Put a thermocouple in the water at the switch and heat the water. It will start showing 130- 138F, be sure the switches are good, and the area around the switch is getting unusually warm.
In this case of a defective HL sensor, you need to order new high-limit switches and replace the damaged one.
FAQs:
Why does my Raypak pool heater keep shutting off?
Restriction in water flow is the leading reason causing the pool heater to keep turning off. Check out the water pressure and placement of the valve. Clean out the clogged heat pump and dirty water filter.
How long should a Raypak pool heater last?
The fact depends on your maintenance. But with proper maintenance, it will last up to 20 to 30 years.
Why is my pool heater making banging noises?
If your heater is creating a strange sound, there may have a higher possibility of the scale building up inside the heat exchanger. Prolonged exposure to high concentrations of pool water’s free chlorine, clogging it is quite normal. Clean out the exchanger in a proper way.
Wrapping Thoughts
At the end point of this article, hopefully, now you are clear about all aspects of the high-limit fault codes on a pool heater. We can effectively resolve the errors by following the above well-proven guide.
If you still have any queries or questions, don’t be late to ask us through comments. We will reply to you ASAP.