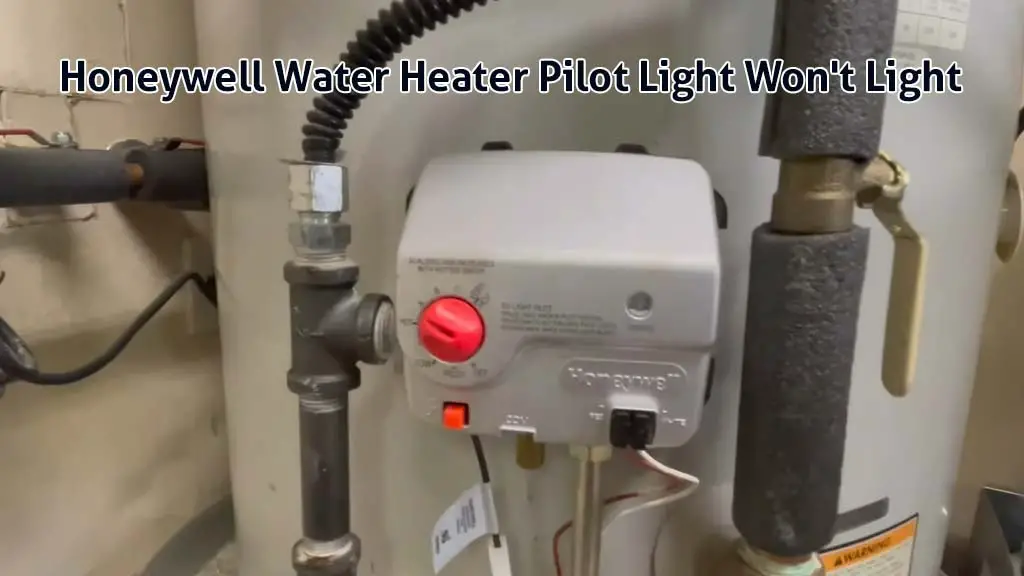
The Honeywell water heater pilot light won’t light when the system cannot confirm a safe, stable flame during startup. In simple terms, the heater either isn’t getting usable gas yet, can’t ignite it properly, or doesn’t trust what it’s seeing and shuts itself down.
The most common reasons behind this are trapped air in the gas line, not holding the pilot button long enough, a weak or misdirected pilot flame, or a dirty or failing thermopile.
On top of that, safety lockouts and internal control valve failures can also cause the same symptoms. I’ll walk you through every possible cause in the correct order and show you how to fix it yourself, step by step.
Honeywell Water Heater Pilot Light Won’t Light [Solved A-Z]
Wondering why your Honeywell water heater pilot light won’t stay lit? Don’t worry, I’ll talk about the possible reasons and solutions in this section.
1. Not Starting the Honeywell Water Heater Properly
Believe it or not, this is the most common reason why your Honeywell water heater pilot light won’t light. Before going into the details, please don’t make any obvious mistakes. For example, make sure that the gas control valve is on and that the unit is getting gas.
It sounds simple, but more people don’t fully realize it than you may think. I once had a client call me in pure frustration. They had just moved into a house that had been sitting empty for months. Nothing made sense.
One day, the stove would not work at all. The next day, the stove suddenly worked, the central heating kicked in, and someone in the house even managed to get a hot shower. Naturally, they assumed the gas situation was sorted. Then, reality hit.
They went to check the water heater and saw no pilot flame. No blinking status light. Nothing. A few hours later, the water was ice cold again. At that point, they were convinced something was broken.
They were asking the same question you probably are right now: Is the gas on or off? And why is this thing behaving like it has a mind of its own? What was actually happening had nothing to do with broken parts.
When a house sits unused for a long time, especially if the gas has been shut off or worked on, air gets trapped inside the gas lines. Gas appliances do not run on air. They need actual gas.
Until that trapped air is pushed out, appliances behave unpredictably. Some work briefly. Some do not light at all. Some tease you with hot water and then leave you shivering. This is one of the most misunderstood Honeywell water heater issues I see.
On these Honeywell-controlled heaters, the pilot system is very sensitive during startup. If air is sitting in the pilot gas line, the igniter can spark perfectly and still not light anything.
You can press the button, hear faint gas sounds, and click the igniter over and over while nothing happens. That makes most people assume the igniter, controller, or gas valve is bad. In this case, none of that was true.
Once I explained what was really going on, the fix was simple but painfully unintuitive. I told them to press and hold the pilot button. Not for a few seconds. Not for thirty seconds.
I told them to be prepared to hold it for one to three full minutes. While holding it down, they needed to press the igniter every ten to fifteen seconds. At first, nothing happened. Then, after much longer than felt reasonable, they finally smelled a faint bit of gas.
A moment later, the status light came on. The pilot lit. They kept holding the button a little longer so the safety sensor could heat up. Then they released it. The pilot stayed lit. Hot water came back. Problem solved.
That is why so many people later say things like “this saved me.” Nothing was broken. The heater was fine. The gas was there. The only issue was air trapped in the gas line, and the only cure was patience.
This problem usually shows up after one of these situations:
- The gas was shut off for a while.
- The house was vacant for weeks or months.
- A gas regulator or line was replaced.
- The water heater sat unused for a long time.
When that happens, air fills the pilot gas line. When you try to light the pilot, you are not getting pure gas right away. You are pushing air out first. Until enough air clears, the pilot simply will not ignite.
This creates confusing symptoms. You may hear clicking. You may even hear what sounds like gas. The status light stays completely dead. That makes it look like an electrical or control problem, but it is not.
Even after the air starts clearing, many people still fail here. On Honeywell systems, the pilot button does more than just release gas. It also allows the safety sensor to heat up. That sensor needs time. Much more time than people expect.
If you let go of the button too early, the system assumes the flame is unstable and shuts the gas off immediately. The pilot may light briefly and then die the instant you release the button. That is a classic symptom I see all the time.
If this is happening to you, it does not mean the heater is faulty. It means you are letting go too soon. In many cases, holding the button down for sixty to one hundred eighty seconds is exactly what fixes it. It feels wrong. It feels excessive. But it is correct.
Solution:
If your Honeywell water heater pilot will not light, or lights and dies immediately, the first thing you should do is slow down and follow the proper procedure. Rushing this process creates more problems and makes a working heater look broken.
It is also critical that you respect the waiting periods. If you keep clicking the igniter without success, you must wait about ten minutes before trying again. This is not optional. That waiting time allows any unburned gas and trapped air to clear safely from the chamber.
Skipping this step is one of the fastest ways to turn a simple startup issue into a dangerous situation. Once you reset and give the system time, try again properly, and I hope that’ll work for you.
How to Light the Honeywell Water Heater Pilot Light Properly
Honeywell systems are very sensitive during startup, especially if the gas was off recently or the heater sat unused. The key here is patience and following the steps in the right order. Do not skip steps, and do not try to outsmart the process.
Step 1: Set the Control to Pilot and Start Purging the Line
Make sure that the gas supply is okay. Then, start by turning the control knob that acts as the thermostat to the “Pilot” position. Once it is set, press the pilot button down and keep it pressed. This is not a quick press. This button needs to stay down the entire time.
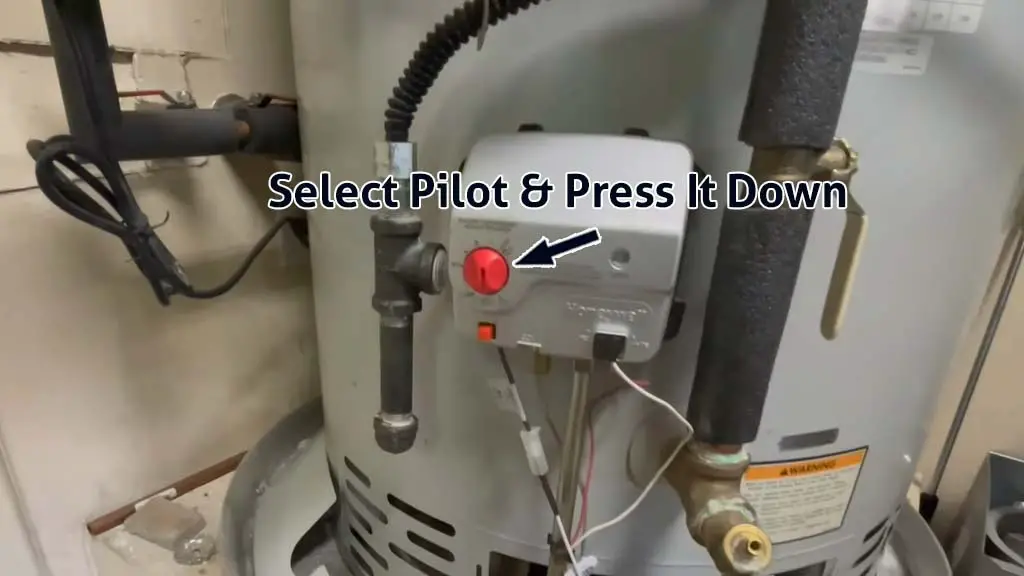
While holding the button, press the igniter once every ten to fifteen seconds. Do not click it rapidly. Rapid clicking does nothing but frustrate you. What you are doing here is slowly pushing air out of the pilot gas line so real gas can reach the pilot.
If the gas was shut off recently or the heater has not been used for a long time, this step alone can take one to three minutes. That is normal. If nothing happens right away, do not assume failure. Stay patient and keep going.
Step 2: Let the Pilot Light and Stabilize
Watch through the small viewing window while continuing the process. At some point, you should see the pilot flame ignite. When you do, do not let go of the pilot button yet.
Keep holding the button down for at least thirty to sixty seconds after the flame lights. This part is critical. The safety sensor needs time to heat up. If you release the button too early, the system will shut the gas off, and the pilot will go out immediately.
Most people fail here because they let go too soon. Holding the button longer than feels reasonable is often exactly what makes the difference.
Step 3: Release Slowly and Complete the Startup
After the pilot has been burning steadily for long enough, slowly release the pilot button. If the flame stays lit, turn the control knob to your desired temperature setting.
Once the pilot is stable, the status light should begin blinking normally. That blinking light is your confirmation that the system is now powering itself correctly.
If the pilot does not light after several attempts, stop and wait ten full minutes before trying again. This waiting period clears trapped air and any unburned gas from the chamber. Skipping this step can prevent ignition and create unsafe conditions.
In most cases, following these three steps exactly brings the heater back to life. No parts replaced. No service call. Just the correct procedure done patiently. If holding the button longer solves it, you can be confident the heater was never the problem.
2. Weak or Misdirected Pilot Flame
If starting the heater properly did not solve the issue, this is the next place you should look. A weak or misdirected pilot flame is one of the most common reasons a Honeywell water heater pilot light won’t stay lit.
The important thing to understand is this: the pilot flame does not just need to exist. It needs to be strong enough and aimed correctly. If the flame does not hit the sensor directly, the heater will never register it as safe, even if the pilot is technically burning.
When this happens, the heater behaves as if it almost works. But almost is not enough. On Honeywell systems, the pilot flame must fully heat the sensor. If it does not, the gas shuts off by design.
A healthy pilot flame should be strong, steady, and mostly blue. It should wrap around the sensor tip, not barely touch it, and not miss it entirely. If the flame is too small, yellow, flickering, or aimed away from the sensor, the system will shut itself down every time.
Even a slight misalignment is enough to cause problems. When the pilot flame is weak or misdirected, you will usually see one of these behaviors.
- You click the igniter.
- You clearly have a spark.
- But no flame appears at all.
- Or the pilot lights briefly but goes out immediately.
- Or the flame is visible but very small.
- Or the flame burns yellow instead of blue.
- Or the flame is not touching the sensor properly.
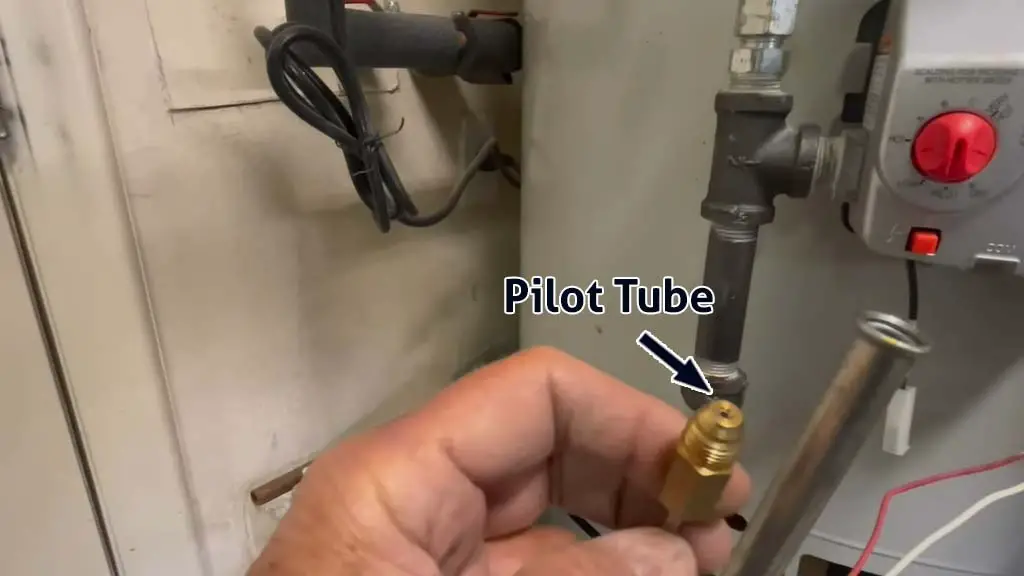
If the flame does not fully envelop the sensor tip, the pilot will not stay lit. Period. A restriction or contamination in the pilot system almost always causes this problem. Here are the most common reasons behind it:
- The pilot orifice can be partially clogged.
- Dust, rust, or carbon can block the pilot slit.
- Spiderwebs can restrict gas flow.
- The pilot tube itself can be obstructed.
- Poor air and gas mixing weakens the flame.
In all of these cases, gas either does not reach the pilot head properly or burns weakly once it does. The flame exists, but it cannot heat the thermocouple or thermopile enough to keep the gas valve open. So the heater shuts it down.
Solution:
If you have a spark but no flame, or a flame that will not stay lit, stop troubleshooting electronics. This is not a control board problem. This is a flame quality problem.
Start by shutting the heater off completely and turning off the gas supply. Let everything cool down before touching the pilot area. Once it is safe, inspect the pilot assembly closely. Look for visible dirt, dust, or misalignment. If it looks dirty, it is dirty.
Blow compressed air through the pilot tube and pilot head. This step alone fixes a large number of Honeywell pilot issues. Make sure air passes freely through the orifice. Do not poke it with sharp objects. Enlarging the orifice will create new problems.
If needed, remove the burner assembly so you can clean the pilot head and orifice properly. Take your time. A rushed cleaning is usually ineffective. After cleaning, reassemble everything carefully and try lighting the pilot again using the proper startup procedure.
If you cannot establish any flame at all, stop here and clean again. Do not keep clicking the igniter, hoping it will fix itself. If a strong blue flame appears and clearly hits the sensor, you can move forward. Once the flame is correct, the pilot will stay lit, and the heater will operate normally again.
3. Failed Igniter
This one is easy to check. Unfortunately, a failed igniter is one of the main reasons why a Honeywell water heater won’t light properly. Before you blame gas, sensors, or the control valve, you need to confirm one very basic thing. The igniter has to work.
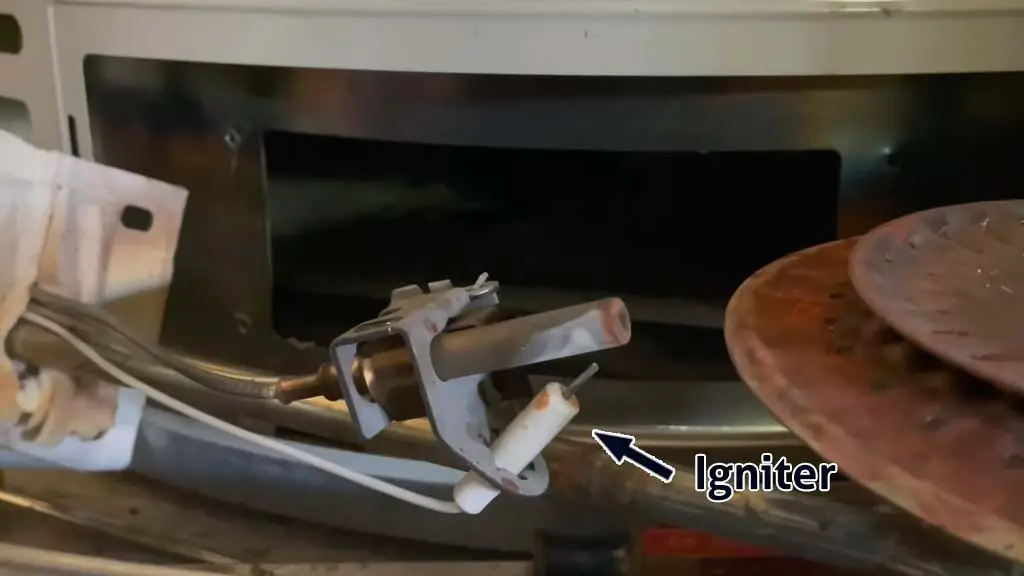
If it does not produce a spark, nothing else matters. No spark means no flame. Period. The igniter’s only job is to create a spark at the pilot. That spark ignites the gas. If the spark is missing, the pilot will never light, no matter how perfectly you follow the startup steps.
This is why checking the igniter should always happen early in the process. Honeywell water heaters use a mechanical igniter. When you press the igniter button, it should create a visible spark at the pilot head. That spark is what starts everything.
If the igniter fails, it simply does nothing. You can press the button all day and get no flame. That makes this one of the easiest failures to identify if you know what to look for.
A failed igniter has one clear symptom. It does not produce a spark.
- You press the igniter.
- You hear or feel a click.
- But you see no spark at the pilot.
Do not assume the click means it is working. These igniters can click mechanically without producing an actual spark.
How to Test the Igniter Properly
Before touching anything else, test for spark. Although it’s a fairly simple process, it’s a full breakdown of how you should be testing it:
- Turn the control knob to the OFF position. This is important. You are not trying to light the pilot yet. You are only checking the igniter.
- Dim the lights if needed and look through the sight glass.
- Now press the igniter button.
If you see a bright spark at the pilot head, the igniter button, wire, and electrode are functioning properly. At that point, you move on to gas- and flame-related checks. If you see no spark at all, stop right there. You can now conclude with 100% surety that a bad igniter is causing the pilot light failure.
Solution:
If there is no spark, do not continue troubleshooting the pilot system. Cleaning the pilot, purging air, or holding the button longer will not help. The heater cannot light without a spark.
Your only option in that case is to replace the faulty igniter with a new one. You’ll have to remove the main burner and get access to the pilot assembly to access it. But once you do, it’s easy enough to replace it.
Once the spark is restored, return to the normal pilot lighting procedure and continue diagnosing from there. If a spark is present, the igniter is not your problem. Move on to the next cause.
4. Thermopile Issues
If your Honeywell water heater pilot lights normally but refuses to stay on, this is the next place you should focus. At this stage, gas is reaching the pilot, and ignition is clearly working. Yet the moment you release the button, the flame dies. That tells you the safety system is not satisfied.
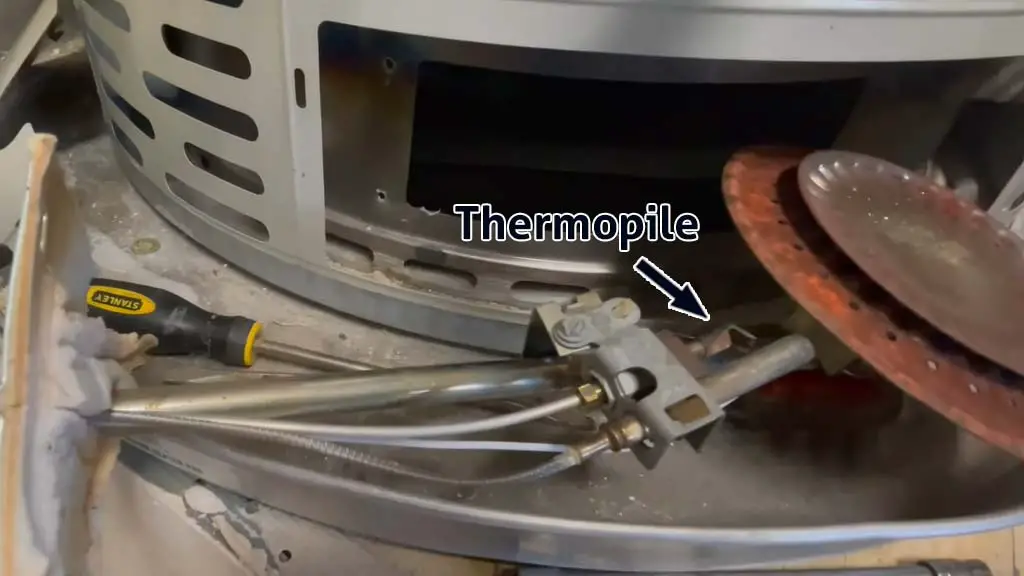
On many Honeywell water heaters, the device responsible for proving the pilot flame exists is not a thermocouple. It is a thermopile. The thermopile is a heat-powered safety sensor.
When the pilot flame heats it, the thermopile generates a small DC voltage. That voltage does two jobs. First, it tells the gas valve that a real flame is present, and it is safe to stay open. Second, on some Honeywell systems, it also helps power the control circuitry.
If the thermopile is dirty, bent, misaligned, or weak, it cannot generate enough voltage. When that happens, the gas valve closes the moment you release the knob, even if you hold it down for a long time.
This is one of the most common reasons a pilot lights but will not stay lit. When the thermopile is the issue, the behavior is very specific.
- The pilot lights while holding the knob.
- The flame looks normal.
- The pilot dies immediately when the knob is released.
This means gas flow is fine and ignition is fine. The failure is happening in the flame safety circuit. At this point, the main suspects are the thermopile itself, the thermal safety switch, or the control valve. Testing the thermopile properly helps eliminate most of that guesswork.
How To Test A Honeywell Water Heater Thermocouple
Before replacing anything, you should verify whether the thermopile is actually bad. Testing it takes only a few minutes and gives you a clear answer.
Step 1: Isolate the Thermopile
Start by turning the control knob to Pilot and lighting the pilot as you normally would. Keep holding the knob down so the pilot stays lit during testing.
To isolate the thermopile output, disconnect the red thermopile lead from the thermal switch or control. This ensures you are measuring only the thermopile and not the rest of the circuit.
Step 2: Set Up the Multimeter Correctly
Set your multimeter to DC voltage and choose the 2000 millivolt range. Place the red probe on the red thermopile wire and the black probe on the white thermopile wire. Make sure the connections are solid, so you get an accurate reading.
Step 3: Read the Voltage Output
With the pilot burning and heating the thermopile, watch the meter. The voltage should rise steadily as the thermopile heats up. A healthy thermopile typically produces between 650 and 850 millivolts. If your reading reaches or exceeds that range, the thermopile is doing its job.
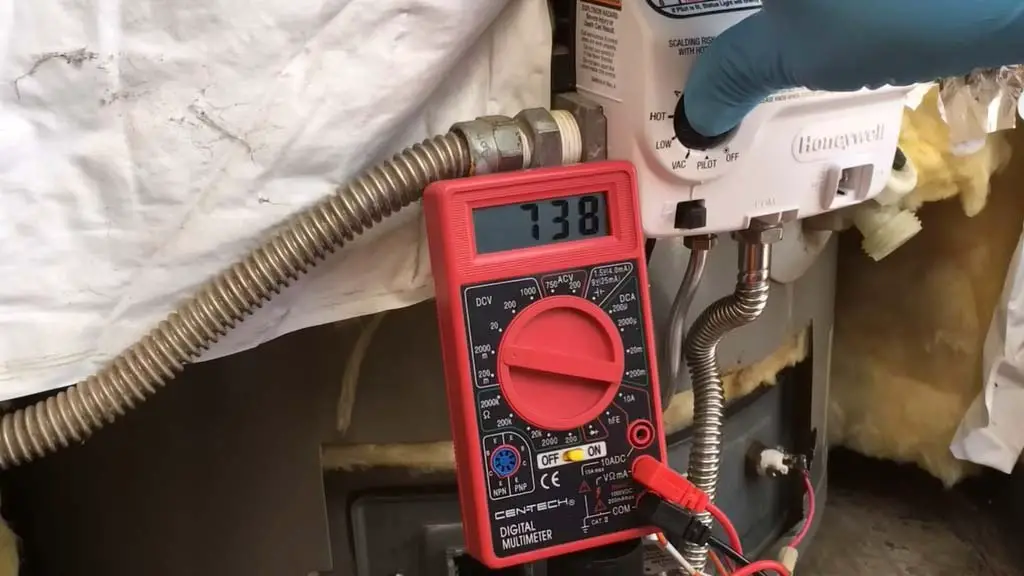
If the voltage is well below this range or does not rise properly, the thermopile is weak or failing. When you release the knob, the voltage will drop. That part is normal.
Solution:
Once you know the thermopile is involved, the fix depends on its condition. If the thermopile is dirty, gently clean the tip using fine 400-grit sandpaper. You are not trying to remove material. You are just cleaning off oxidation or soot so that heat transfers properly.
If the thermopile is bent or not positioned correctly, carefully realign it so the pilot flame fully envelops the tip. Even a small misalignment can prevent proper voltage generation.
If cleaning and alignment do not restore proper voltage, the thermopile is faulty and needs to be replaced. If installing a new thermopile fixes the problem, this was the cause.
How To Replace A Honeywell Heater Thermocouple
Replacing the thermopile is straightforward if you take your time and follow the steps in order.
Step 1: Shut Down and Access the Burner Assembly
Turn the control knob to OFF and shut off the gas supply. Give the heater time to cool completely before working on it. Remove the burner access panel so you can reach the pilot assembly and thermopile. Take note of how the thermopile is positioned before removing it.
Step 2: Remove the Old Thermopile
Disconnect the thermopile leads from the control and carefully loosen the thermopile from the pilot assembly. Be gentle. Do not bend surrounding components or damage the pilot tubing.
Once removed, compare the old thermopile to the replacement to ensure they match in length and connection type.
Step 3: Install and Position the New Thermopile
Install the new thermopile in the same position as the old one. Make sure the tip sits directly in the pilot flame path. Reconnect the leads securely, reassemble the burner components, and restore the gas supply.
Light the pilot using the proper procedure and verify that it now stays lit. If the pilot holds and the heater runs normally, the thermopile is the issue. You can also check out the video on thermocouple replacement.
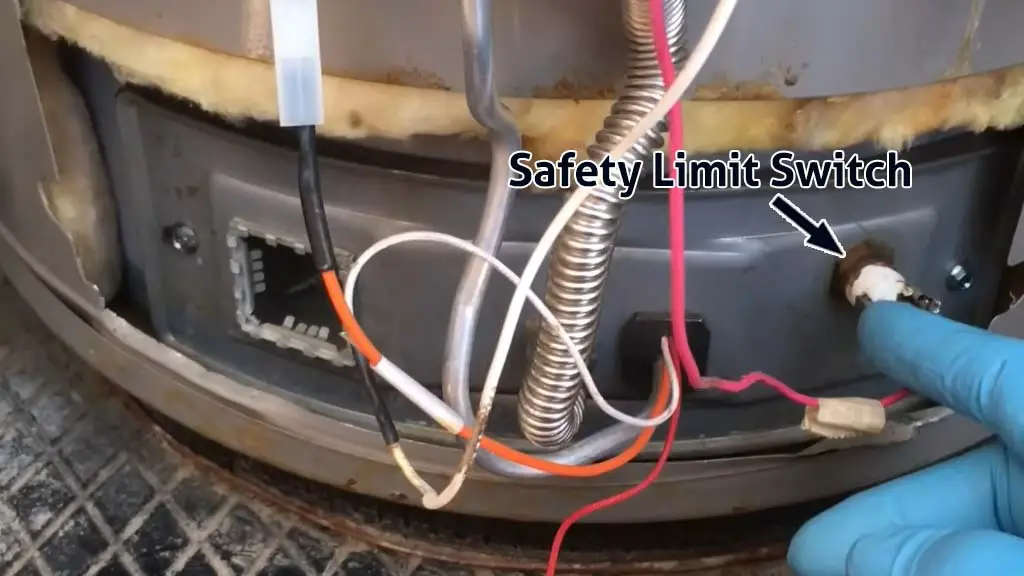
5. Tripped Safety Limits
At this point in troubleshooting, the problem is no longer ignition or fuel delivery. This is where the Honeywell control logic and safety chain take over.
Honeywell gas valves have internal safety logic. If the control believes something unsafe happened, like repeated failed ignition attempts, unstable flame signals, overheating, or vapor detection, it may partially lock itself out. When that happens, the heater behaves inconsistently.
- The pilot may light briefly.
- You may see a small puff of flame.
- The pilot may act differently on each attempt.
- The status light may be completely dead.
This confuses a lot of people because the LED chart becomes useless. On Honeywell systems, the LED status light is powered by the thermopile.
No pilot flame means no thermopile voltage. No thermopile voltage means no LED blinking. So the lack of a status light does not automatically mean the control is dead. In addition to control logic, many Honeywell heaters include safety sensors wired in series with the thermopile.
These include FVIR sensors, rollout switches, high-limit sensors, and thermal switches. If any of these open the circuit, the gas valve will shut down immediately. At this stage, the heater is not malfunctioning. It is protecting itself.
Solution:
If you are dealing with lockouts or safety interruptions, follow these steps in order. Do not guess. Do not replace parts yet.
Step 1 – Perform a Proper Control Reset
Start with the simplest and most overlooked fix. Turn the control knob to OFF and leave it there for at least 10 to 15 seconds. In stubborn cases, waiting up to a full minute is better. This allows the Honeywell control to reset its internal safety logic.
Think of this as rebooting the heater. After waiting, turn the knob back to Pilot and follow the normal lighting procedure exactly. If the pilot now lights and stays on, the control was temporarily locked out and has been reset. No further action is needed.
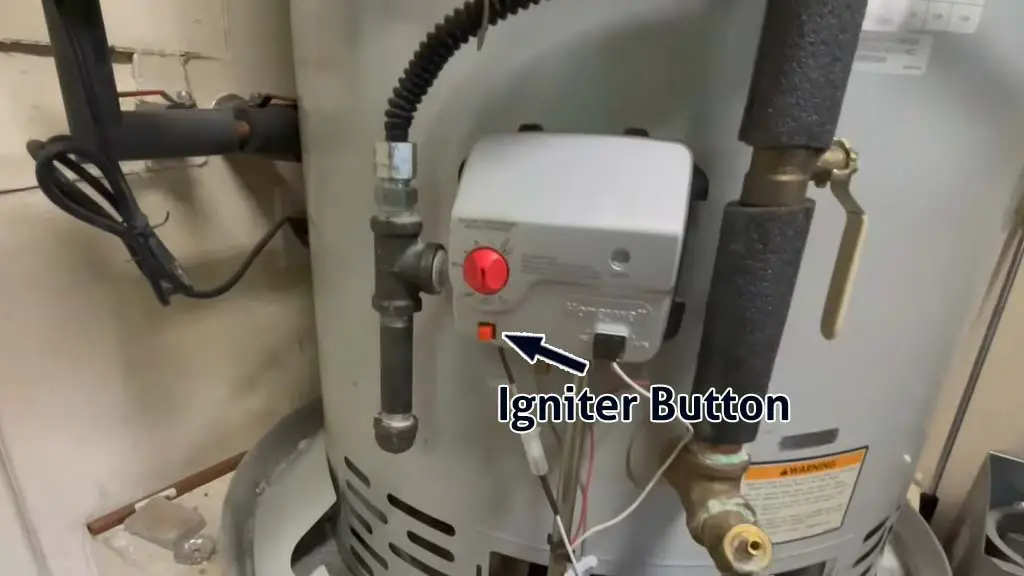
Some Honeywell models also include a physical reset switch related to high-temperature or safety shutdowns. If your model has one, press it firmly once after shutting the control off.
Do not keep pressing it repeatedly. If resetting restores normal operation, the issue was a temporary safety lockout. And if you can’t press that switch, that means the safety lockout wasn’t triggered.
Step 2 – Verify the Safety Circuit Is Not Interrupting Power
If resetting does not help, the next step is to determine whether a safety sensor is interrupting the thermopile circuit. On Honeywell systems, the thermopile does more than prove flame.
It also supplies power to the control board. If anything in the safety chain interrupts that voltage, the pilot will not stay lit, and the status light will remain off. To diagnose this, compare the thermopile voltage in two conditions:
- Thermopile isolated by disconnecting the red lead from the thermal switch.
- Thermopile tested again with the thermal switch back in the circuit.
If the thermopile produces healthy voltage on its own but drops significantly when the switch is connected, the switch is introducing resistance or has failed. A large voltage drop means the switch is bad.
Step 3 – Address Repeated Safety Trips Correctly
If a safety sensor trips repeatedly, do not treat it as a bad part right away. Safety sensors usually trip for a reason. Common causes include:
- Overheating conditions.
- Restricted airflow.
- Vent or flue issues.
- Combustion chamber blockage.
If you replace a tripped sensor without fixing the underlying issue, it will trip again. Only once airflow and venting are confirmed clear should a failed safety sensor be replaced.
6. Internal Control Valve Failure
This is the stage where the diagnosis and the fixes start to get really hard. But if you can’t light the pilot light on the water heater, then you have to keep going.
Inside the Honeywell gas control valve are two critical things: solenoids that physically open and hold gas valves, and a control board that decides when those solenoids are allowed to stay energized.
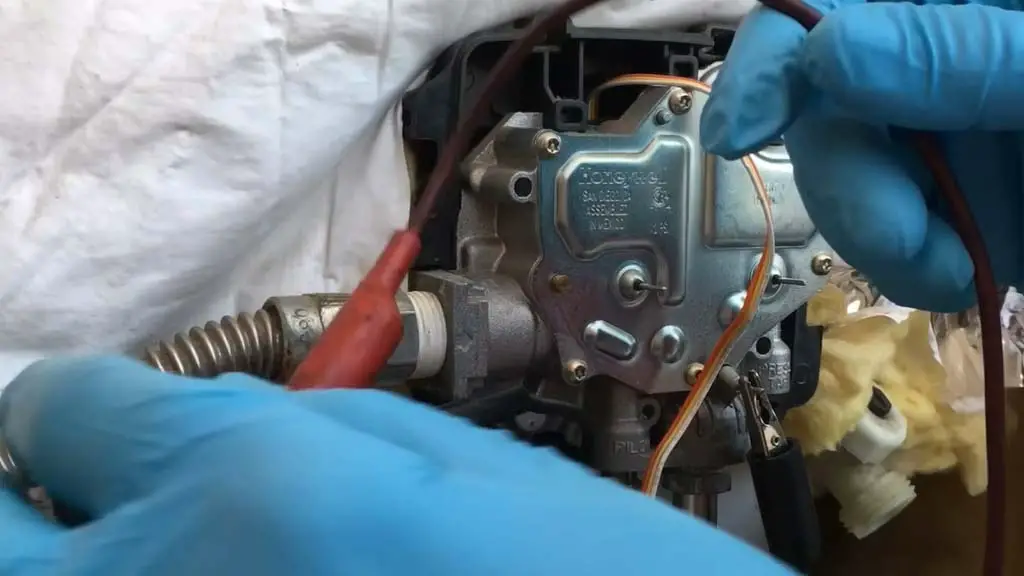
When either of these fails, the heater can look almost normal while still refusing to run. This is why these failures are so frustrating.
a) Failing Pilot Solenoid Inside the Gas Valve
Inside the control valve is a solenoid whose job is simple. When the pilot is proven safe, it stays energized and physically holds the pilot gas valve open. When it loses power, the gas shuts off instantly.
When this solenoid starts failing, it can behave inconsistently.
- The pilot lights normally.
- The status light may blink as expected.
- But the moment you release the knob, the pilot shuts off.
What is happening here is not a sensor problem. The solenoid cannot stay energized. Even though everything upstream is working, the valve drops out the instant manual pressure is removed.
Electrical testing often shows erratic readings or no continuity at all. In this situation, replacing thermopiles, cleaning pilots, or resetting controls will not help. The failure is internal to the valve.
b) Control Board Failure (Extremely Common on Honeywell Valves)
This is the most common end-stage failure on Honeywell WV-series gas valves. By the time you reach this diagnosis, all of the following have already been confirmed good:
- Gas supply.
- Igniter spark.
- Pilot flame quality.
- Thermopile voltage.
- Thermal switch.
- Airflow and venting.
Yet the pilot still will not stay lit. At this point, the control board has failed internally. Heat slowly kills these boards. Over time, they stop recognizing valid thermopile signals or stop sending power to the solenoids, even when everything is correct.
c) Internal Gas Valve Failure (Rare, but Possible)
Actual mechanical gas valve failures are less common than board failures, but they do happen.
These include:
- Pilot valve solenoid failure.
- Main burner valve failure.
Advanced testing involves bench testing the valve with an external DC power source. If the solenoid clicks and opens reliably under direct power, the valve itself is not the problem, and the board is. In practice, if the valves respond but the heater still shuts down, the control board is almost always the real failure.
Solution:
Once an internal solenoid or control board failure is confirmed, there is no adjustment, cleaning, or reset that will fix it. At this stage, the gas control valve has failed internally.
You now have two realistic options:
- Replace only the control board.
- Replace the entire gas control valve.
In practice, most people replace the entire gas control valve. It eliminates both board and solenoid failures in one shot and avoids chasing intermittent issues. If the water heater is older, replacing the entire heater may make more sense financially than installing a new valve on a tired tank.
Important: Choose the Right Honeywell Gas Control Valve (WV vs WT)
Honeywell makes two common versions of these gas control valves, and this matters more than most people realize.
Older Honeywell valves start with WV (often referred to as “William Victor”).
Newer replacement models often start with WT (“William Tom”). The WV series is the better option if you have a choice.
WV-series Honeywell gas valves allow you to reset or override certain safety lockouts, including the common four-flash high-temperature shutdown. This gives you the ability to recover the heater after a temporary overheating event instead of being permanently locked out.
WT-series valves do not allow this reset. Once they enter a high-temperature shutdown, the control locks out permanently by design. At that point, the valve must be replaced again.
Functionally, both valves heat water. But from a serviceability and longevity standpoint, WV-series valves are far more forgiving and repair-friendly. If you are replacing a Honeywell gas control valve and can still source a WV-series model that matches your heater, choose that over WT every time.
How To Replace A Honeywell Gas Control Valve
Replacing a Honeywell gas control valve is a serious repair. If you are not comfortable working with gas appliances, stop here and call a professional. If you proceed, follow every step carefully and do not rush.
Step 1 – Shut Down Everything and Prepare the Heater
Turn the control knob to OFF and shut off the gas supply at the shutoff valve. Close the cold water supply to the heater. Open a nearby hot water faucet to relieve pressure inside the tank. This prevents unexpected water flow when the valve is removed.
Disconnect the igniter wire, thermopile wires, and any safety sensor connections attached to the control valve. Take photos if needed, so everything goes back exactly where it belongs.
Step 2—Drain the Tank Below the Valve Level
Attach a hose to the drain valve at the bottom of the tank and route it to a safe drain location. Open the drain valve and drain water until the water level drops below the gas control valve opening.
You do not need to drain the entire tank, but the level must be low enough to prevent flooding. Skipping this step will result in water pouring out of the tank when the valve is removed.
Step 3 – Remove the Old Gas Control Valve
Disconnect the burner tube, pilot tube, and manifold connections from the valve. Support the tubing while loosening fittings to avoid bending or cracking them. Once everything is disconnected, use a large wrench to unthread the gas control valve from the tank.
This may require steady force. Remove the valve completely and inspect the tank threads. Clean debris if needed.
Step 4 – Install the New Gas Control Valve
Apply approved gas-rated thread sealant or PTFE tape designed for water heater gas valves to the new valve threads. Thread the new valve in by hand first to avoid cross-threading.
Once seated, tighten securely but do not overtighten. Reconnect the burner tube, pilot tube, igniter wire, thermopile wires, and safety sensors exactly as they were before. Double-check all connections.
Step 5 – Restore Water and Gas and Test Operation
Close the drain valve and reopen the cold water supply. Leave a hot water faucet open until all air is purged and water flows steadily. Once the tank is full, check carefully for leaks around the new control valve.
Only after confirming there are no leaks should you turn the gas supply back on. Light the pilot using the proper Honeywell startup procedure. Hold the knob long enough for the thermopile to heat and confirm the status light begins blinking normally.
Turn the temperature knob to your desired setting and verify the main burner ignites. If the heater operates normally, the repair is complete.
7. Tank Failure
This is the worst outcome in the entire troubleshooting process, and that is exactly why I saved it for last. Up until now, every issue involved ignition, sensors, controls, or logic. All of those are fixable. This one is not. If the tank itself has failed, the heater is done.
No amount of troubleshooting, cleaning, resetting, or part replacement will bring it back. At that point, continuing to diagnose ignition problems is not just pointless; it is unsafe. The most reliable sign of internal tank failure is water leaking from the bottom of the heater.
When a tank fails, water often collects in the drip pan or on the floor with no obvious fitting, valve, or pipe leaking. That water is coming from inside the tank wall. Once that happens, the heater has reached the end of its life.
Solution:
At this stage, the solution is not a repair. It is a decision. If water is leaking from the top of the heater, such as from fittings, valves, or connected pipes, the heater may still be worth repairing. Those leaks are external and often fixable.
If water is leaking from the bottom of the heater and you cannot clearly trace it to a specific external connection, stop immediately. That means the tank has failed internally.
There is no workaround for this. No part replacement fixes a leaking tank. The only safe and correct move is replacing the water heater. That is why this comes last. It is the end of the road.
FAQs
Why is there no blinking status light at all?
The status light is powered by the thermopile. No pilot flame means no voltage, and no voltage means no blinking light. A dead LED does not automatically mean a dead control valve.
How long should I really hold the pilot button?
Longer than feels reasonable. Sixty to one hundred eighty seconds is normal on Honeywell systems, especially after the gas was shut off or the heater sat unused.
Can I light a Honeywell pilot with a lighter?
Usually no. Most Honeywell WV and WT valves are designed to block manual lighting. Forcing it can damage the valve or bypass safety systems.
Is it worth replacing the gas control valve on an old heater?
Sometimes, but often no. On older tanks, the valve cost plus labor approaches replacement cost. Many people choose a new heater instead.
Conclusion
Now you know the real reasons why the Honeywell water heater pilot light won’t light and how to approach the problem logically instead of guessing. In many cases, the issue comes down to air in the gas line, improper startup, or a weak pilot flame rather than a bad part.
When those are ruled out, checking the igniter, thermopile, and safety system usually leads you to the answer. If everything checks out and it still fails, the control valve or the heater itself is at the end of the road.
Well, you can also check out this comprehensive Honeywell Water Heater troubleshooting guide to identify and fix other common issues you may encounter with your water heater.