To complete the Honeywell water heater gas control valve replacement process fully, you need to complete these five steps:
- Shut off the gas supply and turn off the water heater
- Disconnect all wiring, pilot tube, burner line, and gas connections
- Remove the old gas control valve carefully
- Install the new valve and reconnect all components properly
- Refill the tank, check for leaks, and relight the system
If that’s confusing to you, relax. I’ll walk you through the entire Honeywell gas control valve replacement process in detail. So, let’s dive in!
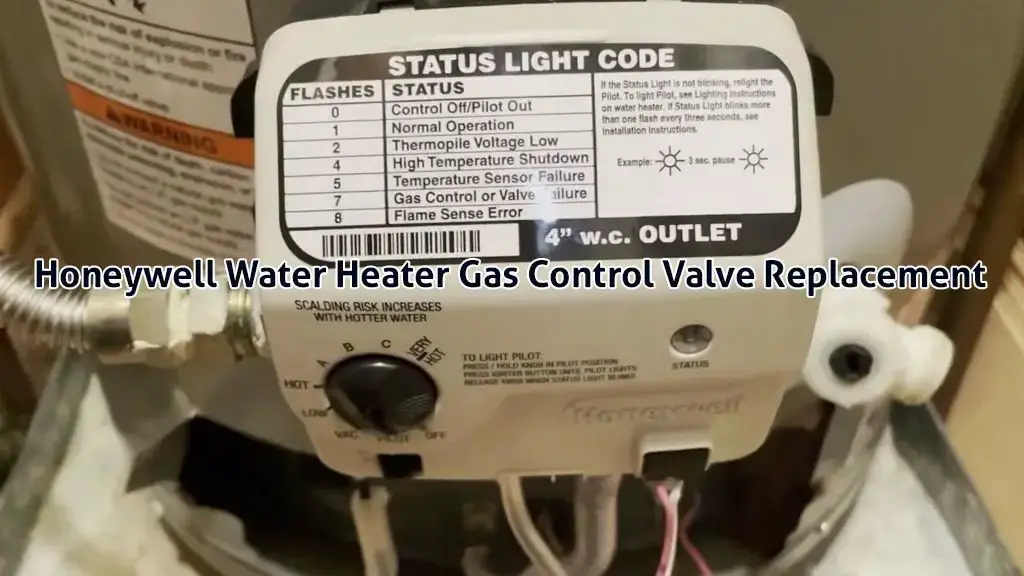
Honeywell Water Heater Gas Control Valve Replacement [Done]
If you’re facing issues with your Honeywell gas control valve, your first instinct shouldn’t be to replace it. There are plenty of ways you can reset it, and that might just resolve the issue you’re facing.
If you’re sure that you’ve tried many steps and you know that replacing is the only solution, then keep on reading. I’ve explained how to replace it in detail in a future section.
If you’re unsure and don’t want to do something drastic, try resetting it first.
How to Reset Honeywell Gas Control Valve
Now, there are many ways to reset the Honeywell gas control valve. Let’s walk you through some of the most common ways to do it.
Method 01: Temperature Knob Reset Sequence
There is no reset button on a Honeywell gas control valve. That’s the part that confuses most people. They keep looking for a hidden switch that simply does not exist.
But here’s what many people miss. These valves still have a built-in reset behavior. It just works through the temperature knob instead of a button.
I’ve seen this fix more random error code situations than people expect. When the status light is acting weird or throwing codes that don’t make sense, this is usually the first thing I try.
Here’s how you do it:
- Start by turning the temperature knob all the way to the “Very Hot” setting. Hold it there for about 10 seconds. Don’t rush it. Give it time to register.
- Next, move the knob down to the “Hot” setting and hold it again for another 10 to 15 seconds. This step matters. Skipping it ruins the whole sequence.
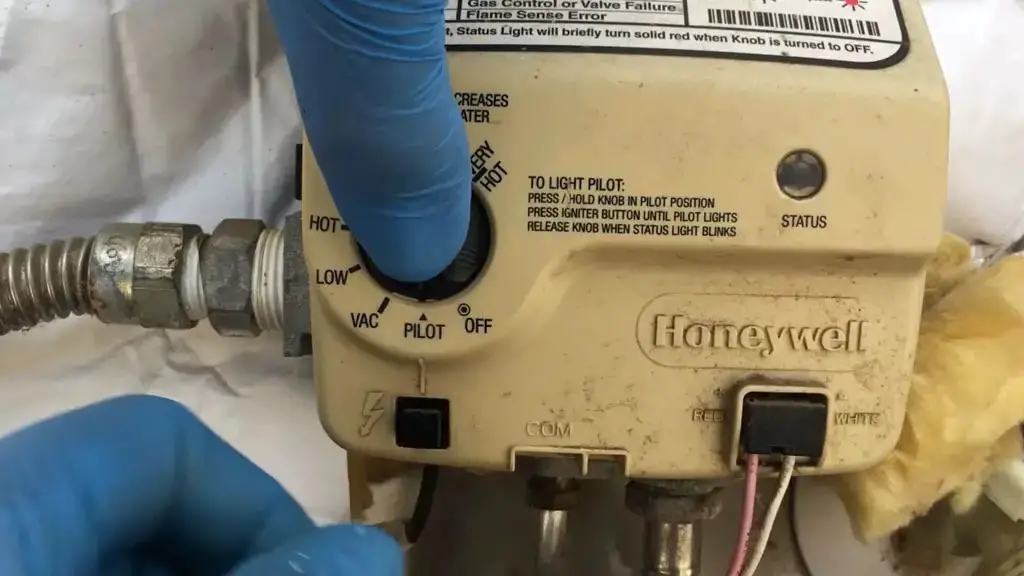
- Finally, turn the knob to the “Pilot” position.
That’s it. No fancy tools, no disassembly. Just a specific sequence.
What you’re doing here is forcing the control system inside the valve to reset itself. Once that’s done, you can go ahead and relight the pilot using the normal lighting steps.
One thing to keep in mind, this method works best on models with black knobs and buttons. If your unit has a red knob setup, the reset process can be slightly different, which is where the next method comes in.
Method 02: Power Cycle & Dial Rotation Reset
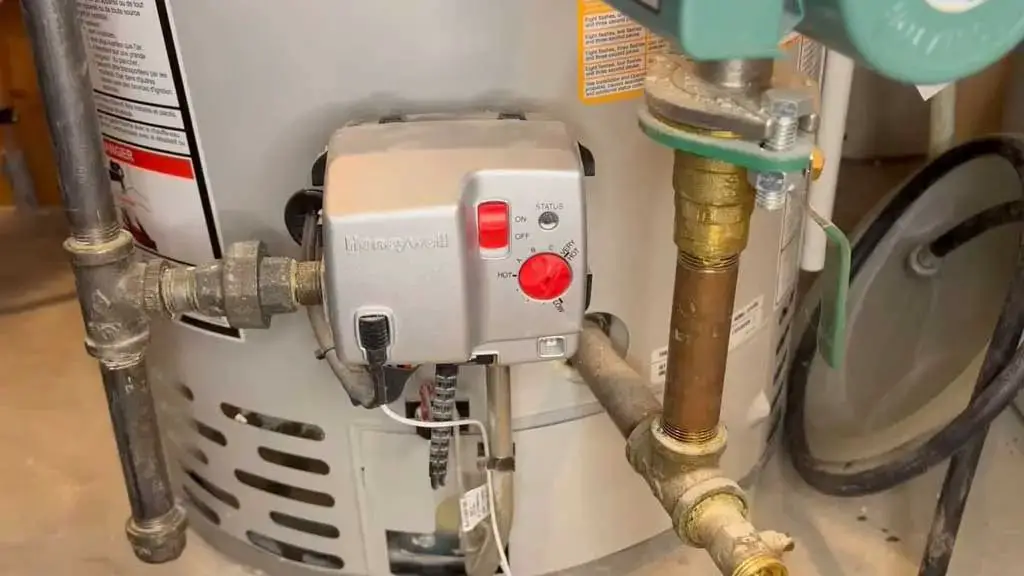
If you are working with a Honeywell gas control valve that has a red button and an On/Off switch, the reset process is a bit more aggressive. This one combines a full power reset with a manual override using the temperature dial.
This method is useful when the system feels completely stuck. The display is unresponsive, the status light is acting up, or the heater just refuses to behave normally.
- Start by unplugging the water heater from the power source. Leave it unplugged for at least 60 seconds. This is not just a formality. You are clearing any stored state inside the control system, so give it the full minute.
- Plug the unit back in after that. Now go to the gas control valve and turn the on/off switch to off. Wait a second, then turn it back on. This step reinitializes the valve after the power reset.
- Next comes the key part. Take the temperature dial and rotate it from the lowest setting to the highest setting seven times in a row. Do it in one smooth sequence. No long pauses, no overthinking. Just steady movement back and forth.
- Once you finish, leave the dial at your desired temperature setting and check the status light.
If the reset worked, the heater should go back to normal operation. If nothing changes, then you are not dealing with a simple glitch anymore. At that point, the valve is trying to tell you something is actually wrong.
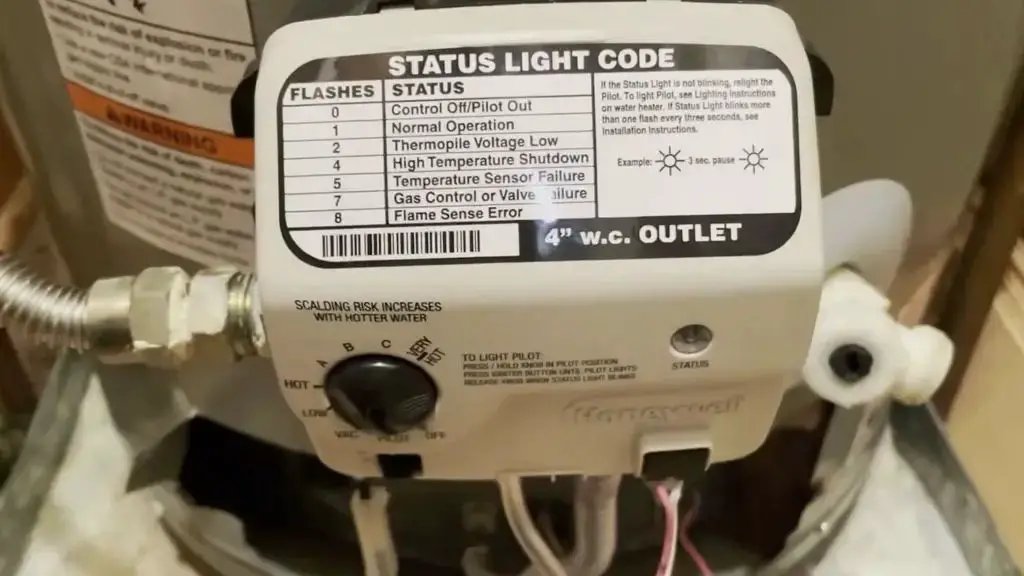
Look at the status light closely. The blinking pattern is not random. There is usually a diagnostic chart sticker on the side of the heater that explains exactly what each flash sequence means.
Count the flashes properly and match them with the chart. That code will point you to the real problem instead of guessing and wasting time.
Method 03: Full Shutdown Reset Sequence
This is the one you try before even thinking about replacing parts. A lot of people jump straight to “the valve is bad,” when in reality, the system is just locked out and needs a proper reset.
And no, flipping it off and on for two seconds does not count. That does nothing. You need to reset the control system properly.
- Start by turning the knob to OFF and leaving it there for a good 5 to 10 minutes. This step matters more than people think. You are allowing any leftover gas to clear out and letting the internal system fully shut down.
- After that, turn the knob to PILOT and relight the pilot using the normal procedure.
- Once the pilot is lit and stable, the actual reset begins.
- Turn the knob all the way to “Very Hot” and hold it there for about 10 seconds. Then bring it down to “Hot” and hold again for another 10 seconds. After that, move it back to “Pilot” and wait another 10 seconds.
- Finally, turn it back to “Hot.”
If everything is working the way it should, you will hear the burner kick on almost immediately. That is your confirmation. What you just did is force the control system inside the Honeywell gas control valve to clear a high-temperature shutdown or internal lockout.
In most cases, this is enough to bring the heater back to life without touching a single component. If this does not work, then you are no longer dealing with a simple reset issue.
Method 04: Control Board Hard Reset (9V Battery Method)
This is the “last resort before replacement” method for a Honeywell gas control valve. It is not something you start with, but when the valve is locked out due to an overheat fault, and nothing else works, this is what actually forces a reset at the control board level.
Start by turning off the gas supply and setting the knob to OFF. Remove the front cover of the valve by taking out the bottom screw and releasing the clips. Once inside, carefully unplug the wiring so you can access the control board.
Now comes the reset. Use a 9V battery and briefly touch the terminals to the board contacts. Negative goes to ground, and you tap the positive side across the other terminals one at a time. If you hear clicking, that is a good sign. It means the internal valve is responding and the reset is being triggered.
After that, reconnect everything, put the cover back on, and restore the gas supply. Relight the pilot and hold it long enough for the system to stabilize.
If the reset worked, the status light should return to a normal steady blink pattern, and the burner should fire up again. If it does not, then the control board or valve is likely beyond saving.
When to Replace a Honeywell Gas Control Valve
If resetting the gas valve doesn’t work and you’ve tried the other problem-specific fixes, it’s time to replace it. Here are the most common scenarios in which you may end up replacing the gas control valve:
- Pilot light will not stay lit: If the thermopile/thermocouple is good, the pilot is clean, and the gas supply is fine, the valve may not be holding the pilot circuit open.
- Burner will not fire: The pilot may light, but the main burner never kicks on. That can happen when the valve is not opening the main gas passage properly.
- No hot water: If the heater has gas and spark but still does not heat, the control valve may not be sending gas to the burner.
- Status light error codes: On Honeywell-style valves, flashing light codes can point to issues like sensor failure, high-temperature shutdown, weak thermopile signal, or internal control failure.
- Temperature problems: If the water gets too hot, not hot enough, or the valve does not respond correctly to the temperature setting, the internal thermostat/control section may be failing.
- Gas valve or control board failure: Some Honeywell valves have an electronic control board on the front. If that board fails, the whole valve may seem dead even if the mechanical parts are fine.
- Leak at the valve body or threads: Less common, but serious. If gas leaks from the valve body itself, replacement is usually the answer. Do not play hero with gas leaks.
If you’re convinced that replacing is the only solution, don’t worry, I’ll guide you through exactly how you can do it, following the simplest of steps.
How to Replace a Honeywell Water Heater Gas Control Valve
Replacing a Honeywell gas control valve is not complicated, but it is one of those jobs where rushing will punish you. You are dealing with gas, water pressure, and delicate internal parts all at once.
If you follow the process step by step and stay patient, the swap is usually straightforward. The goal is simple: safely remove the faulty valve, install the new one correctly, and bring the system back online without leaks or damage.
Step 1: Shut Everything Down and Make the System Safe
Start by turning the temperature control knob to the off position and shutting off the gas supply completely. This is non-negotiable. A gas line left open is not a “small mistake”; it is a serious hazard.
If you’re not sure how to do it, just turn the handle perpendicular to the gas lines to close it off. Parallel means open, and perpendicular means closed. After that, turn off the water supply to the heater.
Now you have two options. The manufacturer-recommended method is to fully drain the tank before removing the valve. There is also a shortcut method using an airlock, where you partially drain the tank until the water flow slows down.
This works, but only if no one uses water in the house during the process. If someone flushes a toilet or opens a tap, your “shortcut” turns into a mess instantly. If you want zero risk, drain the tank fully.
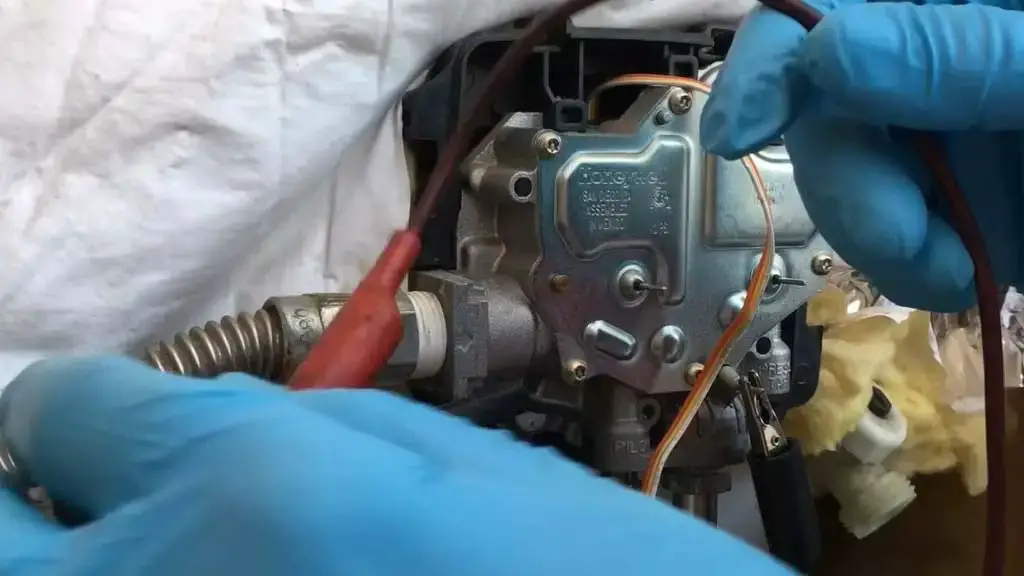
Step 2: Disconnect All Wires, Tubes, and Gas Connections
Once everything is off, start isolating the valve. Disconnect the thermopile wiring by gently rocking the connector back and forth. Do not yank it out like you are pulling weeds, because those connectors are easy to damage. Next, unplug the igniter wire and remove the burner supply line and pilot tube.

Be especially careful with the pilot tube. It bends easily, but it also kinks just as easily, and once that happens, you are creating extra problems for yourself. Keep it out of the way without forcing it.
After that, disconnect the main gas supply line. Use proper tools and support the piping so you do not put stress on the valve or surrounding fittings. At this point, the valve should be completely isolated from the system.
Step 3: Remove the Old Valve Carefully
To remove the old valve, thread a short nipple into it and use that as leverage to turn it counterclockwise. This avoids damaging the internal components, which can happen if you grip the valve body directly with a wrench.
If you drained the tank properly, removal is clean. If you used the airlock method, be ready to swap quickly because a small amount of water will leak out. Either way, once the valve loosens, remove it fully and set it aside.
This is also where many people get sloppy. Do not rush the removal. If threads bind or feel off, stop and check alignment. Cross-threading here will turn a simple repair into a full replacement job.
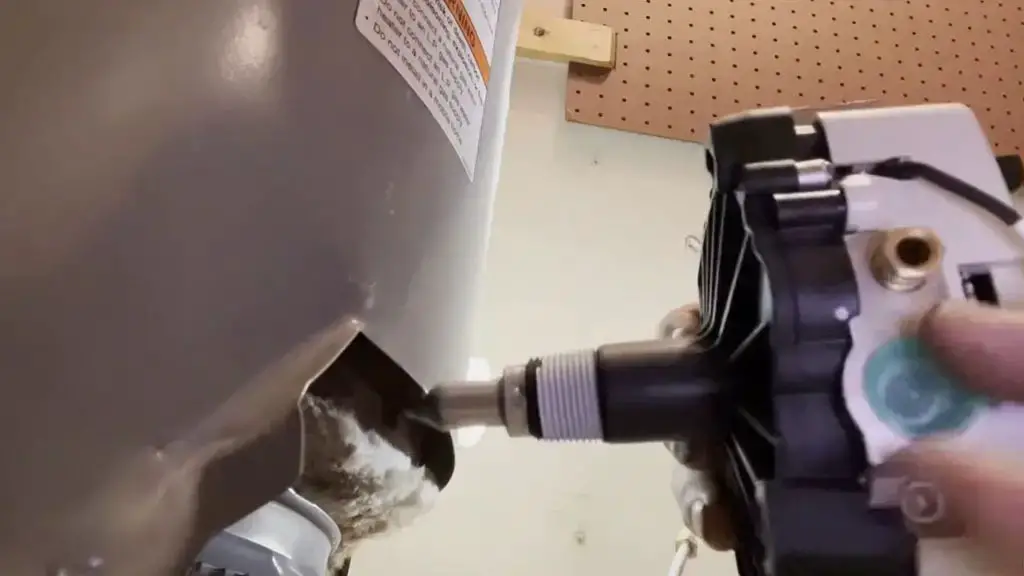
Step 4: Install the New Valve and Reconnect Everything
Prepare the new valve by wrapping the threads with gas-approved Teflon tape in a clockwise direction. Thread it in carefully and make sure it sits level. Tighten it firmly, but do not overdo it. Over-tightening can damage the valve or threads, which defeats the whole purpose.
Once the valve is in place, reconnect the pilot tube, burner supply line, and gas line. Start connections by hand first to avoid stripping threads. After that, tighten them using two wrenches so you are not putting stress on the valve body.
Reconnect the thermopile wires and igniter wire. Make sure everything is seated properly. Loose connections here can cause ignition failure later, and then you will be troubleshooting all over again.
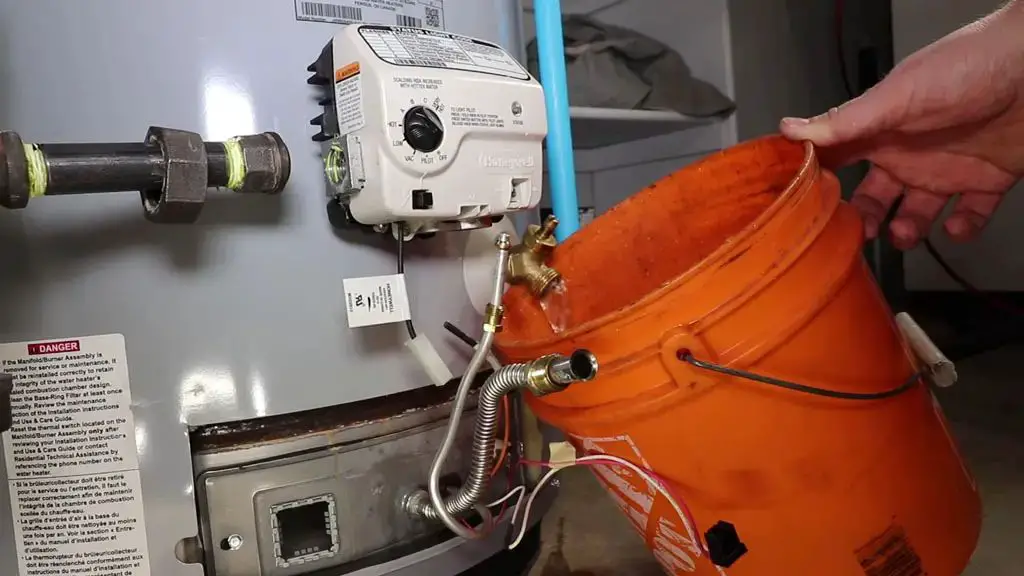
Step 5: Refill, Test, and Relight the System
Turn the water supply back on slowly and allow the tank to fill. Open a hot water faucet to purge air from the system. Once water flows steadily, you know the tank is full. Only then should you fully open the cold water supply.
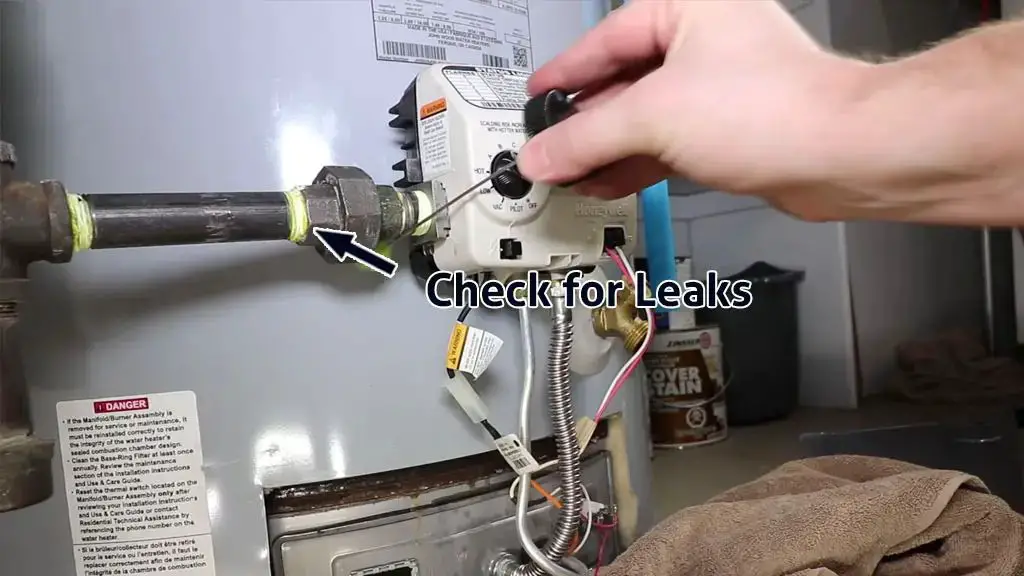
Before turning the gas back on, check for water leaks around the valve. Once that looks good, restore the gas supply. Now comes the critical part: check for gas leaks. Use a soap solution on every connection. If you see bubbles forming, shut everything down and fix the connection. No shortcuts here.
Finally, relight the heater. Turn the control knob to pilot, press and hold it, and use the igniter. It may take a few attempts because air needs to purge from the gas line. Once the pilot stays lit, hold the knob for about a minute, then release and set your desired temperature.
At this point, the main burner should fire up. Let it run and do one last leak check. If everything is clean, the job is done properly. If you follow this process without cutting corners, the replacement job should be done easily.
The only time it becomes a nightmare is when someone tries to “wing it” around gas and pressure systems. That is not the place to get creative. And if you’re not careful with what you’re doing, this could be a serious hazard.
FAQs
How much does a Honeywell water heater gas control valve replacement cost?
The Honeywell water heater gas control valve replacement cost usually ranges between $100 and $300, depending on the model and labor. DIY can be cheaper, but professional installation increases safety and reduces the risk of gas leaks.
Can I use a used Honeywell gas control valve instead of buying new?
Using a used Honeywell water heater gas control valve replacement is possible, but not recommended. You have no guarantee of internal condition, and a faulty valve can lead to gas leaks or repeated failures.
Is there a difference between natural gas and propane valve replacements?
Yes. A natural gas Honeywell water heater control valve replacement is different from propane versions. The internal calibration and gas flow settings are not the same, so always match the valve to your fuel type.
What causes a Honeywell gas control valve failure in the first place?
Most Honeywell water heater gas control valve failure cases happen due to overheating, sediment buildup, faulty thermopiles, or internal control board issues. Sometimes it’s just wear and tear after years of use.
Conclusion
Now, you know the entire Honeywell water heater gas control valve replacement process and what to do if something goes wrong with the process. But always try resetting the heater first and see if that solves the issue.
Try the first four types of reset, and if that fails, only then you can move forward with the replacement process. I also have a guide on what to do if your Honeywell heater shuts off abruptly due to high temperature. Check it out!