
If your Glo Warm heater is giving you trouble, it is usually not random. Most problems come from the same few causes: startup mistakes, dirty components, airflow issues, or worn pilot parts.
In this complete Glo Warm heater troubleshooting guide, you will learn how to fix the most common problems, including pilot issues, ignition failures, burners not lighting, shutdowns after running, odor problems, condensation, and unusual noises.
Start at the top, follow each section in order, and fix the simple things before replacing parts. Now, let’s dive in!
Glo Warm Heater Troubleshooting [Complete Guide]
Most of the problems that people face are related to the pilot light, the heater not burning, etc. So, before getting into all of that, I want to make sure that you’re not making any rookie mistakes.
The way to do that is to ensure that you’re starting your Glo Warm heater correctly. If you don’t, then maybe the issue is with the startup and not a technical issue with the heater.
How To Start Glo Warm Propane Heater Correctly?
Alright, no guessing and no winging it. This is a propane heater, not a candle. Follow these steps in order and take your time. You do not need strength here; you need sequence. Read each step fully before you touch anything.
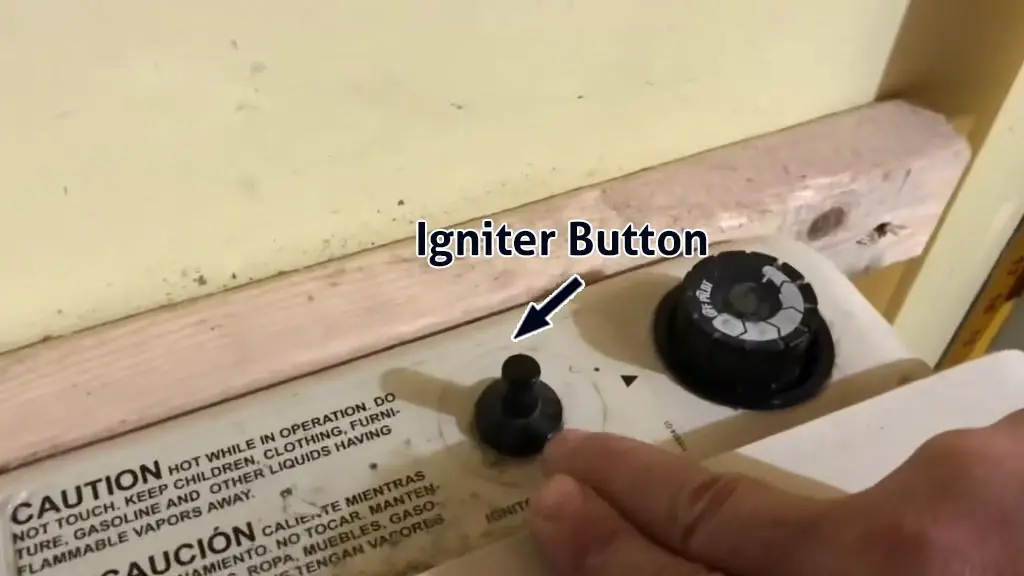
Step 1 – Check The Igniter And Make Safe Connections
Before you even think about turning the gas on, check the igniter. Press the igniter button a few times and look for a visible spark. If you do not see a spark, stop here. A dead igniter means the heater will not light properly.
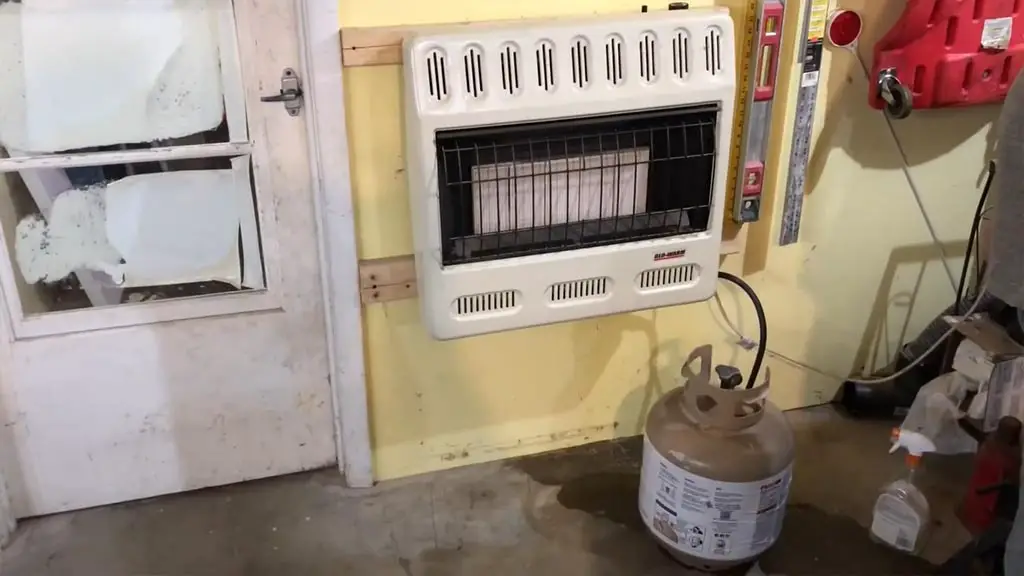
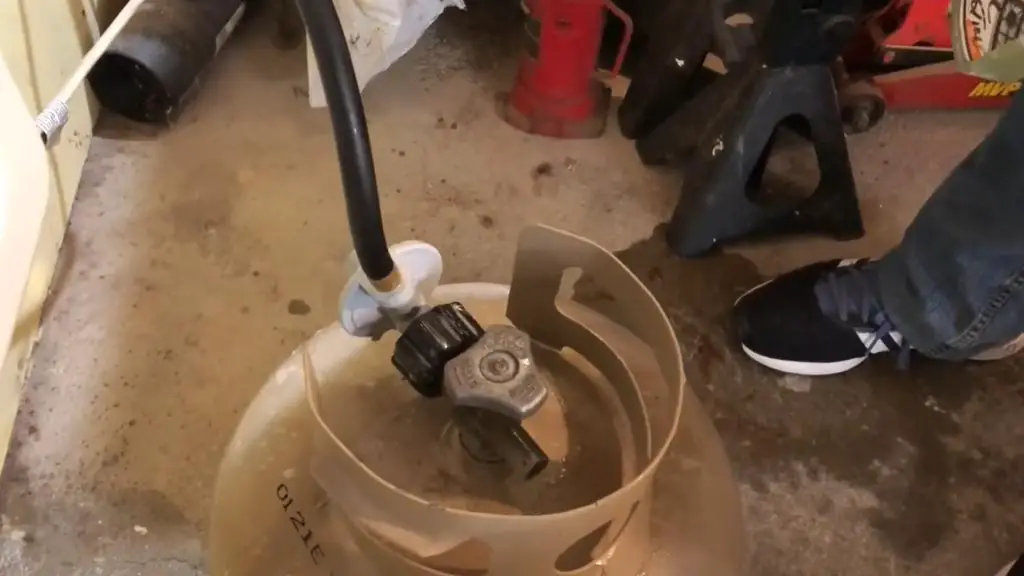
Once the igniter is confirmed to be working, connect the heater to your propane tank. The fitting is designed to be hand-tight only. Do not use tools. Tighten it firmly with your hand and stop.
Now open the propane tank valve. Turn it counterclockwise to open fully, then back it off just slightly. This is normal practice with propane tanks.
Next, mix some dish soap with water and spray it on the tank connection and along the hose. Follow the hose all the way to the heater. Watch closely for bubbles. If you see bubbles, you have a leak.
In that case, shut the gas off immediately and fix the connection before continuing. Do not skip this step. Propane leaks inside a garage are not a learning experience you want.
Step 2 – Light The Pilot Properly
Make sure the control knob on the heater is in the OFF position to start. Then turn it one click to PILOT. Now push the control knob inward. This allows gas to flow to the pilot.
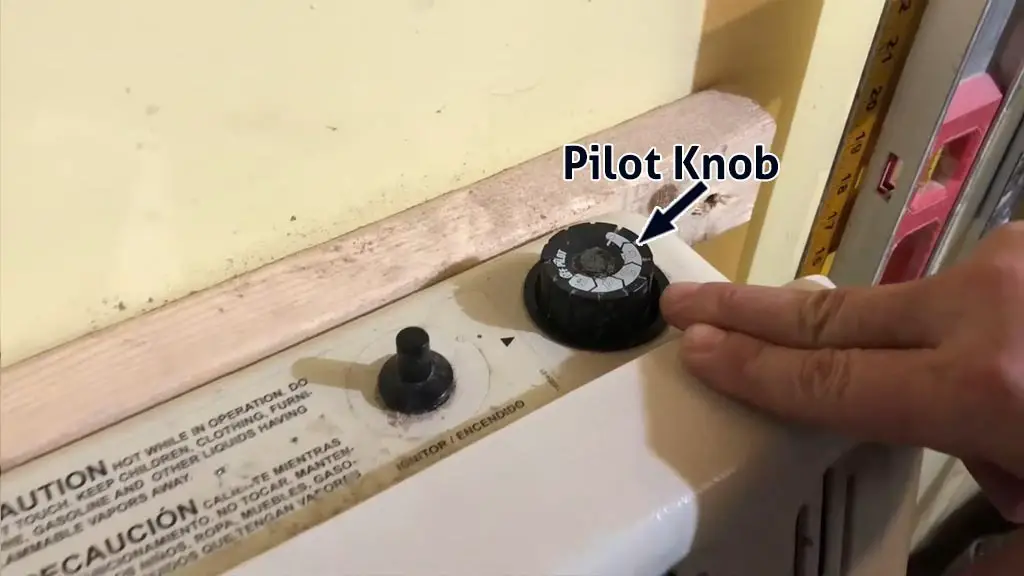
While holding the knob in, press the igniter repeatedly until the pilot flame lights. It may light on the first click, or it may take a few tries. That is normal.
Once the pilot is lit, keep holding the knob in for about 30 to 60 seconds. This gives the safety sensor time to heat up and confirm that the flame is real. If you release the knob too early, the pilot will shut off.
After a full minute, slowly release the knob. If the pilot stays lit, you are good. If it goes out, turn the knob back to OFF and repeat the process. Do not rush this part. The heater needs to sense heat before it allows operation.
Step 3 – Turn On The Heater And Shut It Down Correctly
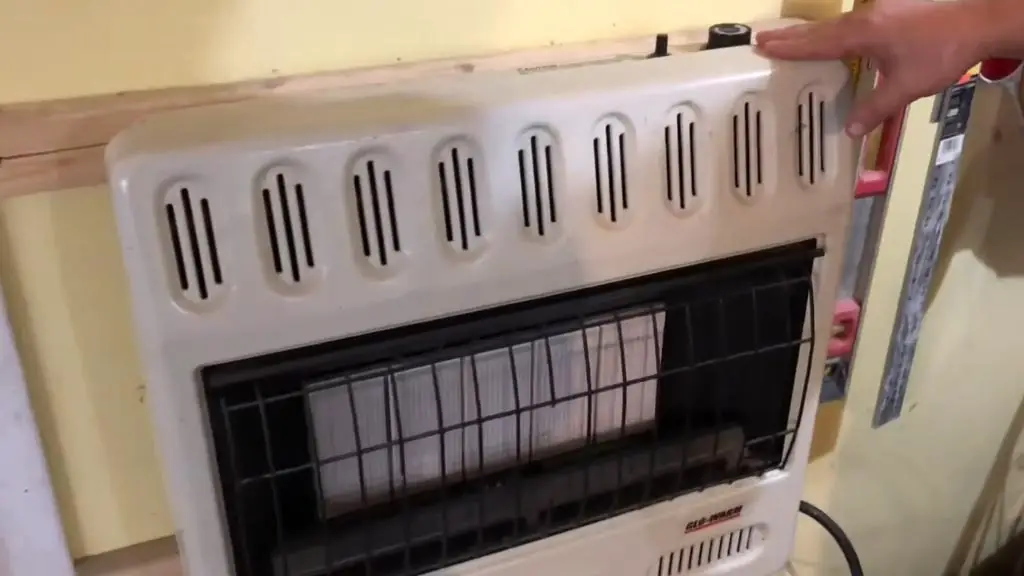
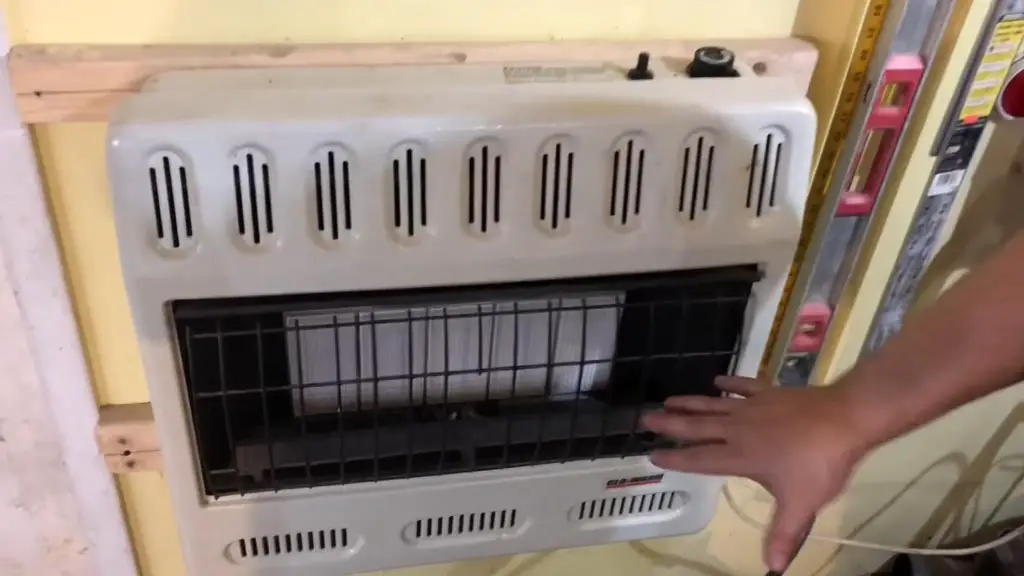
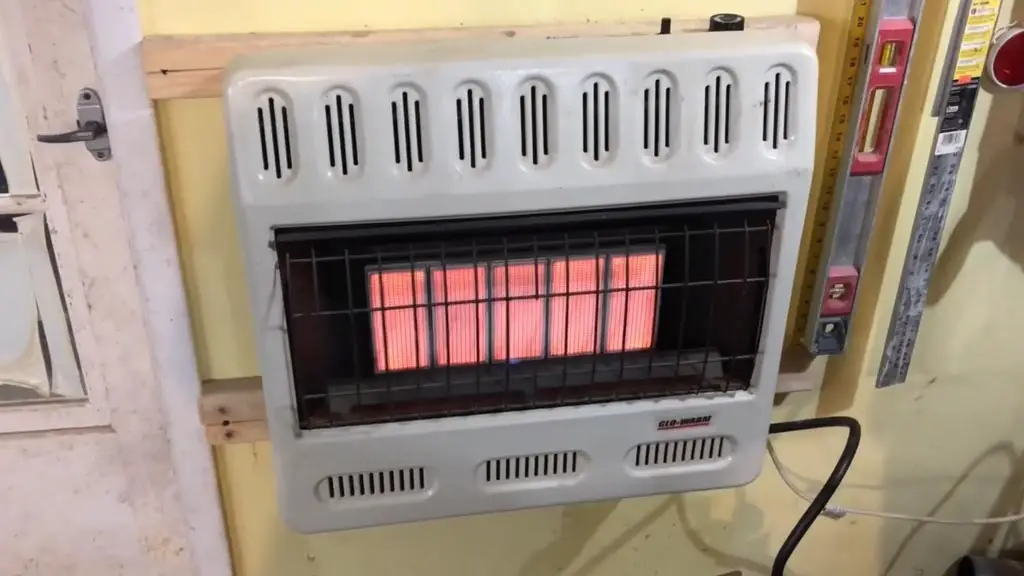
With the pilot lit and stable, turn the control knob counterclockwise to the ON position. You will see the heater panels start to glow and feel heat almost immediately.
After a few minutes, the fan will turn on automatically. This is normal. The fan runs on household power and helps move hot air while protecting the heater from overheating.
If the heater gets too hot, turn the knob down slightly to reduce the flame. If you want to stop heating but keep the pilot lit, turn the knob back to PILOT. This allows you to restart the heater quickly without relighting.
To fully shut the heater down, turn the knob to OFF. The pilot will go out, and the gas flow will stop. The fan may continue running briefly while the heater cools itself. That is expected.
Finally, close the propane tank valve completely by turning it clockwise until snug. This is the last step and ensures the system is fully shut down. Follow these steps every time. The heater will start cleanly, run safely, and last longer. Skipping steps is how people end up searching for repair videos at midnight.
With that said, make sure you follow the right startup procedure. If you didn’t follow the right startup procedure previously and are facing an issue, try following that first. Only then, move on to the troubleshooting guide for more specific problems and their solutions. Let’s begin!
1. Heater Shuts Off After A While
The most common issue that people generally run into when using Glo Warm heaters is that they shut off after 20-30 minutes of use. I’ll explain why it happens and how you should go about diagnosing and fixing it.
In most cases, this is not a gas supply problem. It is a safety shutdown. The heater is doing exactly what it is designed to do when it thinks the flame is not safe or not being detected properly. The two most common causes here are the Glo warm heater thermocouple and the pilot assembly.
The thermocouple is a small sensor that sits directly in the pilot flame. Its only job is to sense heat. If it does not detect enough heat, it tells the gas valve to shut everything off. This can happen if the sensor is dirty, slightly misaligned, or starting to fail.
If the thermocouple is working but the heater still shuts down, the next likely cause is the pilot light itself. A dirty or restricted pilot nozzle can produce a weak flame.
Even if the flame is visible, it may not be strong or steady enough to properly heat the thermocouple. Over time, this causes the heater to shut off after 15 to 30 minutes.
Solution:
If this sounds like what your heater is doing, follow these steps in order. Do not skip ahead. First, you have to start by checking and cleaning the thermocouple. To do that, shut the heater off completely and let it cool down. Turn off the gas supply and unplug the heater if it has a fan.
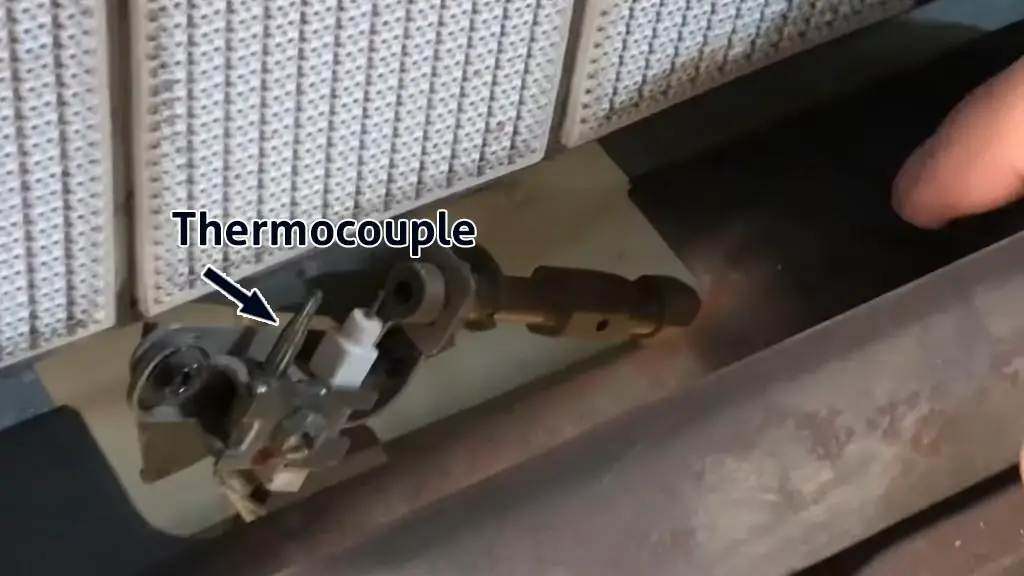
Remove the front cover so you can access the pilot area. Inspect the pilot flame and thermocouple position. The flame should be blowing directly onto the thermocouple tip. If it is not, gently adjust the alignment so the sensor sits fully in the flame.
Next, remove the thermocouple and clean it using a Scotch pad or a fine abrasive pad. You are not sanding it down. You are just removing soot and buildup so heat can transfer properly. Reinstall it and make sure the connection at the gas valve is snug, not loose.
Reassemble the heater enough to test it with the front cover in place. Relight the pilot and run the heater. If it now stays on, the problem was a dirty or poorly sensing thermocouple, and you are done.
If the heater still shuts off after running for a while, the issue is no longer just the thermocouple. At that point, the pilot assembly itself is failing. This includes the pilot, thermocouple, and igniter as one unit.
In that case, the fix is to replace the entire pilot assembly. Just look up Glo Warm heater replacement parts list, and you’ll find the right part. This is usually a straightforward job, and the replacement part is inexpensive. Once replaced, the heater should run continuously without shutting off.
How To Replace Glo Warm Heater Pilot Assembly?
Replacing the entire Dyna-Glo pilot assembly is easier than it sounds. Follow these steps carefully, and you’ll be fine. No rushing, no forcing parts.
Step 1 – Power Down & Access The Pilot Assembly
Start by shutting everything down completely. Turn the gas supply off at the propane tank. If your heater has a fan, unplug the power cord as well. Let the unit cool down fully before touching anything inside.
Next, remove the front cover of the heater. There are screws on both sides holding it in place. Once the screws are out, slide the front panel straight off and set it aside.
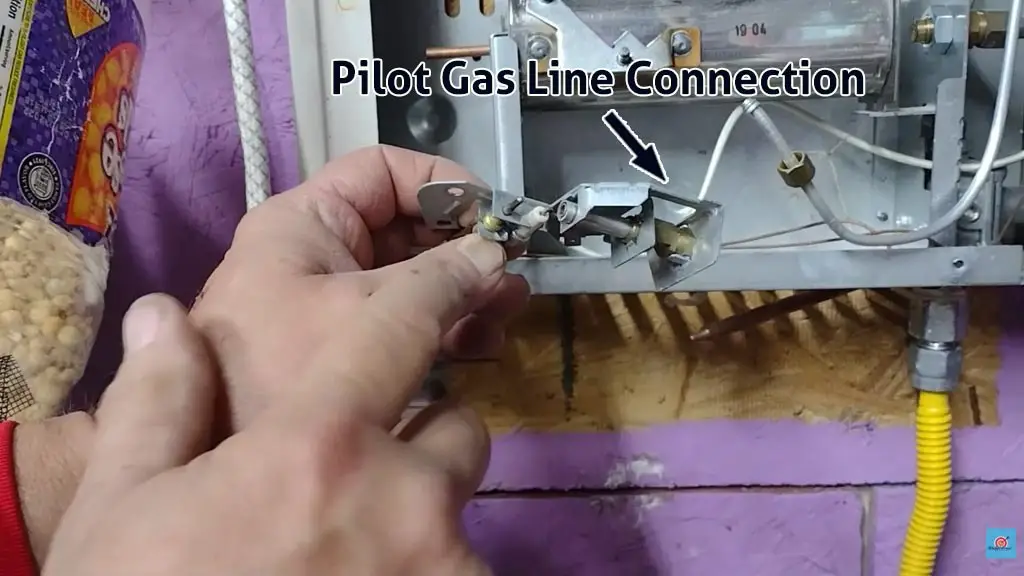
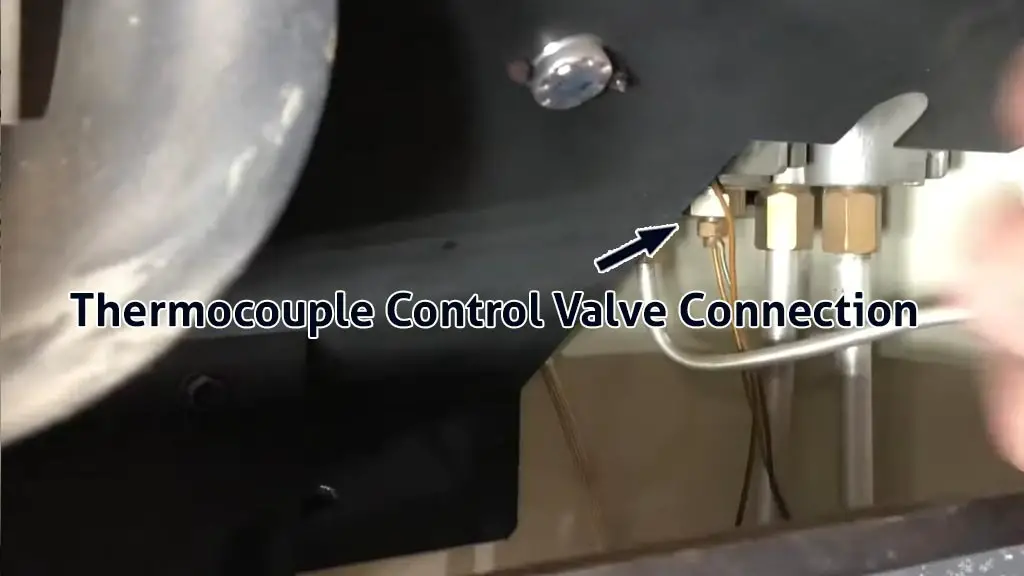
Inside, you will see a secondary inner panel that folds upward. Lift it gently and remove it to expose the internal components. At this point, you should have a clear view of the igniter, pilot flame, thermocouple, and the pilot assembly mounting bracket.
Take a moment to look at how everything is routed. Notice where the pilot gas line runs and how the thermocouple wire is positioned. Take a picture if needed. This makes installation much easier later.
Step 2 – Disconnect And Remove The Old Pilot Assembly
Locate the pilot gas line connection. This is the small tube feeding gas directly to the pilot. Using a wrench, loosen the fitting carefully and disconnect the pilot gas line. Once loose, set it aside without bending the tubing.
Now move to the thermocouple connection at the gas valve. This is typically finger-tight once loosened. Use a wrench to break it loose, then finish removing it by hand. Slowly unroute the thermocouple wire from the heater so it comes out cleanly.
Next, remove the screws holding the pilot assembly in place. There are usually two or three screws securing the bracket. Once removed, the entire pilot assembly, including the pilot, igniter, and thermocouple, will come free as a single unit.
Pull the assembly out carefully and set it aside. This is the part that is causing the shutdown issue.
Step 3 – Install The New Pilot Assembly And Test Operation
Take the new pilot assembly and carefully feed it into position in the same way the old one was removed. Start all connections by hand first. This prevents cross-threading and stripped fittings.
Thread the thermocouple into the gas valve by hand until seated. Once aligned, snug it gently with a wrench. Do not overtighten. Finger-tight plus a small turn is enough.
Reconnect the pilot gas line and tighten it securely, again without forcing it. Mount the pilot assembly bracket using the original screws, and make sure it is firmly secured.
If the new assembly includes a built-in igniter, remove the old igniter and install the new one into the igniter mount.
Before testing, temporarily reinstall the front cover. This step matters. The heater needs proper airflow for the pilot flame to behave normally. Testing without the cover can give false results.
Turn the gas supply back on and restore power to the unit. Set the control knob to PILOT, push it in, and allow gas to flow. Press the igniter until the pilot lights. Hold the knob in for about 15 to 30 seconds, then release it.
If the pilot stays lit, turn the control knob to ON and let the heater run. Allow it to operate for at least 20 to 30 minutes. If the heater continues running without shutting off, the repair is successful.
Once confirmed, shut the heater down, let it cool, and reinstall the front grill and screws securely. This repair solves one of the most common Glo Warm heater problems. When cleaning and tightening the thermocouple fails, replacing the full pilot assembly is the permanent fix.
Remember that cleaning is the first fix. Only if that doesn’t work should you move on to replace the pilot light. Replacement is the final fix. Trying anything else after this usually just wastes time, and if the issue still persists, I would ask for the help of a qualified technician directly.
2. Heater Won’t Light Even If It Sparks
Another common issue people face when troubleshooting the Go Warm wall heater is that the heater won’t light even when there are sparks. You press the ignitor; you clearly see sparks at the ODS or pilot, but the heater refuses to light. No pilot flame, no heat, just clicking and disappointment.
When this happens, the ignitor is not the problem. The spark proves it is working. The issue is that gas is either not reaching the pilot correctly or the safety system is preventing ignition. In vent-free heaters, this is almost always related to the pilot system, thermocouple, or gas flow conditions.
The most frequent causes are a clogged pilot orifice, a dirty or misaligned thermocouple, or improper operation of the control knob. Dust, debris, and even spider webs can block the tiny pilot gas opening.
When that happens, the spark has nothing to ignite. Even a partially blocked pilot can stop ignition entirely. Another common issue could be the fault of the user, but it also happens often. If the control knob is not pressed fully or not held in long enough, gas never flows to the pilot.
In such situations, the heater will spark all day and still never light. Loose thermocouple connections, low gas pressure, or a failing ODS pilot assembly can also cause this exact symptom.
Solution:
If your heater sparks but will not light, work through these fixes in order. First, make sure you are operating the heater correctly. Turn the control knob to PILOT, press it in fully, and hold it in while clicking the ignitor.
Keep the knob pressed for at least 30 seconds after the pilot lights. Many heaters will not light simply because the knob was released too early.

Next, confirm the gas supply. Make sure the equipment shutoff valve is fully open. If you are on propane, confirm the tank valve is fully open. If the gas pressure is low, the pilot will not light. If this is a natural gas unit and the pressure seems weak, contact your gas supplier.
If operation and gas supply are correct, shut the heater off and let it cool. Remove the front cover to access the pilot assembly. Inspect the pilot area closely. Dust buildup is extremely common, especially on garage heaters. The pilot orifice is very small, and even light debris can block it.
Disconnect the pilot gas line and carefully clean the pilot orifice. Use compressed air if possible. A thin wire can be used gently to clear debris, but do not enlarge the opening.
Never clean with an open flame nearby. Once cleaned, reinstall the pilot line snugly. Do not use pipe dope on this fitting. It seals by design.
Now inspect the thermocouple. Make sure the pilot flame hits it directly when lit. If the thermocouple is dirty or oxidized, clean it lightly with a Scotch pad or fine steel wool. You are removing soot, not grinding it down.
Check the thermocouple connection at the control valve. If it is loose, tighten it using your hand and then an additional quarter turn with the wrench. A loose thermocouple connection can prevent ignition or cause immediate shutdown.
Reassemble the heater enough to test it with the front cover in place. Vent-free heaters rely on proper airflow, and testing without the cover can give false results. If the pilot now lights and stays lit, the problem was dirt, alignment, or a loose connection, and the issue is resolved.
If the heater still will not light even after cleaning and tightening, the problem is likely a failing component. At that point, the fixes are straightforward:
• If the thermocouple is damaged, replace the thermocouple.
• If the pilot will not light or stay lit despite cleaning, replace the ODS or pilot assembly.
• If none of the above works, the control valve itself may be faulty and will need replacement.
You already know how to do this since you learned to replace the pilot assembly. Now, you can just replace the specific faulty component. Sparking with no ignition is rarely mysterious. It is one of those parts I talked about. Once you know exactly what it is, just replace it, and you’re good to go.
3. Pilot Lights, But Burner Doesn’t Ignite
Up next in this Glo Warm propane heater troubleshooting guide is when the pilot lights fine, but the main burner doesn’t work.
This problem usually shows up when a Glo Warm heater has been sitting unused for years or was recently reinstalled. The pilot lights normally and burns clean blue, but when you turn the control knob or thermostat up, the main burner never ignites.
Usually, there is no flame and often no sound of gas flowing to the burner. When this happens, the igniter is not the issue. A visible spark and a stable pilot flame confirm that ignition and gas supply to the pilot are working. The failure is happening after the pilot stage.
Inside the heater, the pilot and the burner are fed through separate internal paths. Even though they share the same incoming gas line, the burners rely on their own orifice and gas passage. If that path is restricted, the pilot will stay lit, but the burner will never fire.
The most common cause behind this issue is a clogged burner orifice. Dust, dirt, spider webs, and debris are extremely common in heaters that have been stored in garages. It only takes a small amount of buildup to block the burner orifice completely.
Another possibility is that the burner orifice diameter is too small due to obstruction or damage. When this happens, gas flow is restricted enough that ignition cannot occur.
Low inlet gas pressure is also a known cause. If gas pressure is too low, the valve may open but not deliver enough gas to the burner to ignite. This is less common, but it does happen, especially with long runs, partially closed valves, or supply issues.
The key clue is the pilot flame. A clean blue pilot indicates the pilot orifice is clear. That points the problem away from the pilot system and directly toward the burner orifice or gas delivery to the burner.
Solution:
Start with cleaning before replacing anything. The first and easiest thing you can do in this situation is to clean up the burner orifice.
How to Clean a Glow-Warm Heater Burner Orifice?
Make sure you clean the burner orifice first before moving forward and replacing parts. Follow these steps carefully and in order. This is simple work, but attention matters.
Step 1 – Shut The Heater Down Completely And Make It Safe
Turn the heater completely off, including the pilot. Shut off the gas supply at the shutoff valve or propane tank. Do not rely on just the control knob.
Allow the unit to cool for at least 30 minutes. The burner, pilot, and gas fittings must be cool before cleaning. Working on a warm heater increases the risk of damage and injury.
Once cool, remove the front cover to expose the burner and pilot area. This gives you full access to the components that need to be cleaned.
Step 2 – Locate & Inspect The Burner Orifice
With the cover removed, locate the burner orifice and burner tube. This is the point where gas exits the control valve and enters the burner.
Inspect the area closely. Look for dust, dirt, spider webs, or debris inside the burner tube and around the orifice opening. Even small amounts of buildup can restrict gas flow enough to prevent ignition.
Also, inspect the pilot flame area if the heater was previously running. A yellow-tipped pilot flame is a strong indicator that dust is present in the pilot assembly and burner system. If the heater sparks and the pilot lights but the burner will not ignite, this area is the most likely cause.
Step 3 – Clean the Burner Orifice & Pilot Air Inlet Properly
Use compressed air to clean the burner orifice and burner tube thoroughly. A computer air can work well, and pressure should not exceed 30 PSI. Always make sure there is no open flame nearby when using compressed air or aerosol products.
Blow air through the burner ports, slots, and openings to remove dust and debris. If compressed air is not available, a vacuum cleaner with a blow function can be used carefully.
If debris is stubborn, a thin wire can be used gently to clear the burner orifice. Do not force it, and do not enlarge the opening. You are clearing blockages, not modifying the part.
Next, clean the pilot assembly. There is a small pilot air inlet hole near where the pilot flame exits. Lightly blow air through this hole to clear dust. A drinking straw can help direct airflow if needed.
If cleaning does not restore proper ignition, inspect the burner orifice closely. If it appears damaged, deformed, or excessively restricted, replacement may be necessary, as recommended by the manufacturer.
Once cleaning is complete, reassemble the heater, restore the gas supply, and relight the pilot following the normal startup procedure. Routine cleaning every few months prevents ignition problems and false failures. Most burner issues are caused by dirt, not bad parts. Clean first. Replace only if cleaning fails.
If cleaning does not restore ignition, inspect the burner orifice itself. If it appears damaged or excessively restricted, it may need to be replaced, as recommended by the manufacturer.
Next, verify gas supply conditions. Make sure the equipment shutoff valve is fully open. If this is a natural gas unit and you suspect low pressure, contact your local natural gas company to check the inlet pressure. Low inlet pressure can prevent burner ignition even when the pilot is lit.
After cleaning and inspection, reassemble the heater and test it. Light the pilot, then slowly turn the control up to call for heat. Start on a low setting to allow smooth ignition.
In most cases, cleaning the burner orifice solves the problem completely. Replacement of the burner orifice is the next step if cleaning fails. Gas pressure issues are the final consideration.
If the pilot lights but the burner will not ignite, the fix is usually simple. Dirt first. Hardware second. Gas supply lasts.
4. Heater Won’t Ignite
Another issue people often face when they do proper Glo-Warm gas heater troubleshooting is that the heater won’t ignite at all. No pilot light, no sparks—no nothing. So, what to check if the heater is not working?
When this happens, the problem is almost always in the ignition system, not the gas supply. The heater cannot light because the spark that should ignite the gas is missing, weak, or never reaches the pilot area. There are several common reasons for this.
The ignitor electrode may be positioned incorrectly. If the electrode tip is not close enough to the pilot hood, the spark either jumps in the wrong place or does not jump at all.
The ignitor electrode itself may be damaged or broken. Over time, heat and vibration can crack the ceramic insulator or wear down the metal tip.
Another common issue is a disconnected ignitor cable. If the wire between the ignitor button and the electrode is loose, the spark never reaches the pilot.
The ignitor cable can also be pinched, crushed, or wet. If the cable is trapped against sharp metal edges or tubing, it can short out. Moisture in the cable can also prevent proper sparking.
In older heaters, the ignitor cable itself may simply be broken internally. You may hear clicking, but no spark is produced at the electrode.
Finally, the piezo ignitor can fail. The piezo is the part that creates the spark when you press the ignitor button. On many Glo Warm heaters, the piezo ignitor is built into the control valve. When it fails, no spark is produced, no matter what you do.
Solution:
Start by inspecting the ignitor electrode. Remove the front cover and locate the electrode near the pilot. Make sure the tip is aimed directly at the pilot hood and positioned close enough to spark. If the electrode is cracked, damaged, or heavily worn, it needs to be replaced.
Next, check the ignitor cable connection. Make sure the cable is firmly connected to both the ignitor button and the electrode. If it is loose, reconnect it securely.
Inspect the entire length of the ignitor cable. If it is pinched between metal parts, reroute it so it is free and not rubbing against sharp edges. If the cable is wet, dry it completely and keep it routed away from moisture.
If the ignitor cable is visibly damaged or broken, replace the cable. A damaged cable cannot be reliably repaired.
If the electrode and cable are both in good condition, but there is still no spark, the piezo ignitor is likely bad. On many models, this means replacing the ignitor assembly or the control valve itself, since the piezo is part of that valve.
Ignition problems are electrical and mechanical, not gas-related. Fix the spark first. Gas cannot ignite if there is nothing to light it. So, once you fix the ignition issues, hopefully, your heater will work normally.
5. Main Burner Issues
Main burner problems usually show up in three ways. These three common issues are:
- The burner ignites late.
- The burner backfires or pops during operation.
- The burner lights, but the plaque does not glow the way it should.
All three point to problems with gas flow, burner condition, or pressure regulation rather than ignition or pilot issues.
Delayed ignition happens when gas reaches the burner, but not at the right pressure or volume. You turn the heater on, there is a pause, and then the burner finally lights.
This is most often caused by low manifold pressure or a partially clogged burner orifice. Gas is moving, but too slowly or unevenly to ignite immediately.
Burner backfiring during combustion is a more aggressive symptom. You may hear popping, rumbling, or small bangs while the heater is running. This usually means the burner orifice is clogged or damaged, which causes gas to ignite in the wrong place.
A damaged burner can also distort the flame pattern and lead to backfiring. In some cases, a defective gas regulator allows unstable pressure, which creates the same effect.
When the burner lights but the plaque does not glow, the heater is not producing proper radiant heat. This typically points to a damaged plaque, low inlet gas pressure, or the control knob being set between locked positions instead of fully engaged at a proper heat setting.
In that condition, gas flow is restricted, and the plaque never heats evenly. All of these issues share one thing in common. The pilot may be fine, and ignition may technically work, but the burner system itself is not operating under correct conditions.
Solution:
Start with cleaning. Shut the heater off completely and let it cool. Turn off the gas supply before opening anything. Remove the front cover and inspect the burner orifice. Clean it thoroughly using compressed air.
Dust, debris, and spiderwebs are common causes of delayed ignition and backfiring. If the burner orifice is damaged or excessively restricted, replace it rather than trying to force it clean.
Inspect the burner itself. If it is warped, cracked, or damaged, replacement is the only reliable fix. A damaged burner will never produce a stable flame pattern. If ignition is delayed or inconsistent and cleaning does not help, low manifold or inlet gas pressure is likely.
Make sure all gas shutoff valves are fully open. If this is a natural gas unit, contact your local gas company to check the pressure. Pressure issues cannot be fixed at the heater.
For backfiring problems, also inspect the gas regulator. If pressure fluctuates or the regulator is faulty, replace it. A bad regulator can cause repeated combustion problems even with a clean burner.
If the burner lights but the plaque does not glow, inspect the plaque for damage. Replace it if cracked or deteriorated. Also, confirm the control knob is fully locked into a heat setting. Do not leave it between positions, as this restricts gas flow.
Main burner issues are almost always flow and hardware problems. Once you fix these issues, I hope your heater will run normally.
6. Odor-Related Issues
Odor problems with Glo Warm heaters usually fall into three main categories. Some smells are harmless and temporary. Others are warning signs that you should not ignore. Knowing the difference matters. The most common odor complaints are:
- Slight smoke or odor during initial operation.
- Gas odor even when the control knob is in the OFF position.
- Gas odor during combustion while the heater is running.
- Unwanted odors caused by external substances being burned by the heater.
Each of these points refers to a different cause, and not all of them mean something is broken. Slight smoke or odor during initial operation is normal with new heaters or heaters that have not been used in a long time.
This smell comes from residues left behind during manufacturing or long-term storage. Oils, coatings, and dust burn off in the first few hours the heater runs. The odor usually fades on its own after a few hours of operation.
Gas odor when the control knob is in the OFF position is more serious. This typically indicates a gas leak somewhere in the system or a defective control valve that is not fully shutting off gas flow. If gas is present while the heater is off, it is not a “burn-off” smell. It is a safety issue.
Gas odor during combustion usually points to one of two things. Either foreign material is present between the control valve and burner, or there is an active gas leak in the system. Dirt or debris inside the gas tubing can disrupt proper combustion and release an unburned gas smell while the heater is running.
These issues are often made worse by improper gas pressure, loose connections, or fittings that were not checked after installation.
Solution:
First, understand what is normal and what is not. If the odor is slight and occurs only during the first few hours of operation, allow the heater to run. This smell should disappear after several hours as manufacturing residues burn off. Keep the area ventilated during this period.
If the odor is caused by paint fumes, hair spray, cleaning chemicals, glue, or similar products, ventilate the room immediately and stop using odor-producing products while the heater is running. These odors are not heater failures, but continued exposure can damage components over time.
If you smell gas at any time, follow this immediately:
- Shut off the gas supply right away.
- Do not try to light the heater.
- Do not touch electrical switches or use a phone in the building.
- Call your gas supplier from a neighbor’s phone and follow their instructions.
- If you cannot reach the gas supplier, call the fire department.
Once the immediate safety concern is addressed, inspection and testing are required. For a gas odor with the heater OFF, inspect all gas connections. Check fittings from the gas supply to the heater shutoff valve and into the control valve.
Apply a mixture of liquid soap and water to each joint. Bubbles indicate a leak. Correct all leaks immediately. If no external leaks are found and the gas odor persists, the control valve may be defective and must be replaced. A control valve that leaks internally cannot be repaired.
For a gas odor during combustion, shut the heater down and let it cool. Remove the front cover and inspect the gas tubing between the control valve and burner. Foreign material inside the tubing must be removed. Clean the burner orifice and burner tube thoroughly using compressed air.
Pressure testing may be required if odors persist. When pressure testing the gas supply piping system above 1/2 PSI, disconnect the heater from the gas supply and cap off open piping. Excess pressure can damage the heater regulator.
For pressures at or below 1/2 PSI, close the equipment shutoff valve and pressurize the supply piping. Check all joints with soap and water and correct leaks immediately.
To pressure test heater gas connections, open the equipment shutoff valve and main gas valve. Make sure the heater control knob is in the OFF position. Apply soap and water to all heater-side gas joints. Bubbles indicate leaks that must be corrected before operation.
After repairs or adjustments, relight the heater following the proper startup procedure and recheck all connections.
Odor issues fall into two categories: normal burn-off smells and unsafe gas leaks. Burn-off fades on its own. Gas odor should never be ignored. If you smell gas, stop everything and deal with it before running the heater again.
7. White Powder Residue
This issue looks alarming at first, but in most cases it is not a heater failure. White powder residue forming inside the burner box or on nearby walls and furniture is usually caused by household chemical vapors.
When products like furniture polish, wax, carpet cleaners, or similar sprays are used, their vapors get pulled into the heater. Once heated, those vapors break down and turn into a fine white powder.
The heater is not creating this residue on its own. It is reacting to what is in the air around it. Vent-free heaters are especially sensitive to airborne chemicals because they draw room air directly into the combustion process.
Solution:
If you notice white powder residue, stop using odor-producing products while the heater is operating. Turn the heater off before using furniture polish, wax, carpet cleaners, aerosols, or similar household chemicals. Allow the area to ventilate fully before restarting the heater.
Wipe down any residue that has already formed and keep the area around the heater clean and well-ventilated. Preventing this issue is about air quality, not repair. Once you control what the heater is pulling in from the room, the residue will stop forming.
8. Condensation on Windows
If you notice moisture or condensation forming on windows while your Glo Warm heater is running, this is not a leak or a heater defect. It is a ventilation issue. This happens when there is not enough fresh air available for proper combustion.
Vent-free heaters pull oxygen directly from the room. When the air supply is limited, moisture produced during combustion has nowhere to go, so it settles on cool surfaces like windows and walls.
This problem is more common in newer or tightly sealed homes. Modern construction uses better insulation, tighter windows, weather stripping, and sealed doors.
All of that improves energy efficiency, but it also reduces natural airflow. During colder months, homes are sealed even more tightly, which further limits fresh air.
Other appliances can make this way worse than it is normally. Exhaust fans, fireplaces, clothes dryers, and fuel-burning appliances all compete for the same indoor air. When multiple appliances are running, the heater may not get enough oxygen to burn cleanly.
Solution:
The fix is not adjusting the heater. The fix is improving airflow. Make sure the room has adequate fresh air for combustion and ventilation. Crack a window slightly or open a door to allow outside air into the space. This often resolves condensation almost immediately.
Do not install or operate this heater in a confined or unusually tight space unless proper ventilation air is provided. Vent-free heaters require fresh air to operate safely and correctly.
Be aware of other appliances in the home that remove air from the room. Exhaust fans, fireplaces, dryers, and range hoods all reduce available combustion air. If these are running, additional fresh air must be supplied.
Condensation is a warning sign, not a failure. It is the heater telling you the room needs more air. Once proper ventilation is provided, moisture buildup will stop, and the heater will operate normally.
9. Heater Produces a Clicking Noise
Hearing a clicking or ticking noise right after the burner lights or when it shuts off is usually normal. This sound comes from metal parts expanding as they heat up and contracting as they cool down.
When the heater turns on, internal metal components warm up quickly and shift slightly. When they turn off, they cool and settle back. That movement creates the clicking or ticking sound you are hearing. This is common with most gas heaters and does not indicate a failure or safety issue.
Solution:
In most cases, no action is needed. The noise should be brief and occur only during startup or shutdown. Occasional clicking is normal. Persistent or disruptive noise is not.
If the clicking or ticking becomes loud, continuous, or excessive, it may indicate a loose panel or component. In that case, contact a qualified service technician to inspect the heater.
FAQs
Do ventless gas heaters need electricity to run?
Yes, most of them rely on electricity. Even though the heating mechanism takes place through the pilot and doesn’t need electricity, the operation of the fan requires electrical power.
Is it safe to run a ventless heater overnight?
Manufacturers allow it, but it is not recommended. Long run times increase humidity and reduce air quality, especially in bedrooms.
Can I use a ventless heater in a garage?
Even though most people practice this, it’s not recommended at all. Garages often lack proper air volume, and codes commonly prohibit ventless heaters in enclosed or sleeping spaces.
Do ventless heaters increase indoor humidity?
Yes, burning gas releases moisture. This can cause condensation on windows and walls, especially in smaller rooms.
How often should ventless heaters be cleaned?
At least once a year. Clean the burner, pilot, and air intake to prevent soot, odor, and ignition problems.
Conclusion
I hope this Glo Warm heater troubleshooting guide helped you identify and fix the issue you were dealing with. These heaters are simple, but they rely on clean parts, proper airflow, and correct startup to work properly.
Take your time with the diagnosis and work through each section step by step. Once you find the real cause, the fix is usually straightforward. If the problem persists after cleaning and basic checks, reaching out to a qualified technician is the right move.
Well, you can check out my complete guide on Dyna-Glo Kerosene Heater Troubleshooting, if you have Dyna-glo heater & face any issues with it.